Part 1 of 6 · 3 steps · ~15 minutes total
Part 1 — Sign up & wizard
Create your nerapo account, pick a plan and pay through Stripe, finish the 4-step wizard, and download your iOS / Android project zip ready to build.
Sign up and verify your email
You'll need: an email you can check in the next few minutes. No credit card at this stage.
1Open the signup form
From any page on nerapo.com, click Sign up top-right, or Get started on any pricing card. Same form, same outcome.
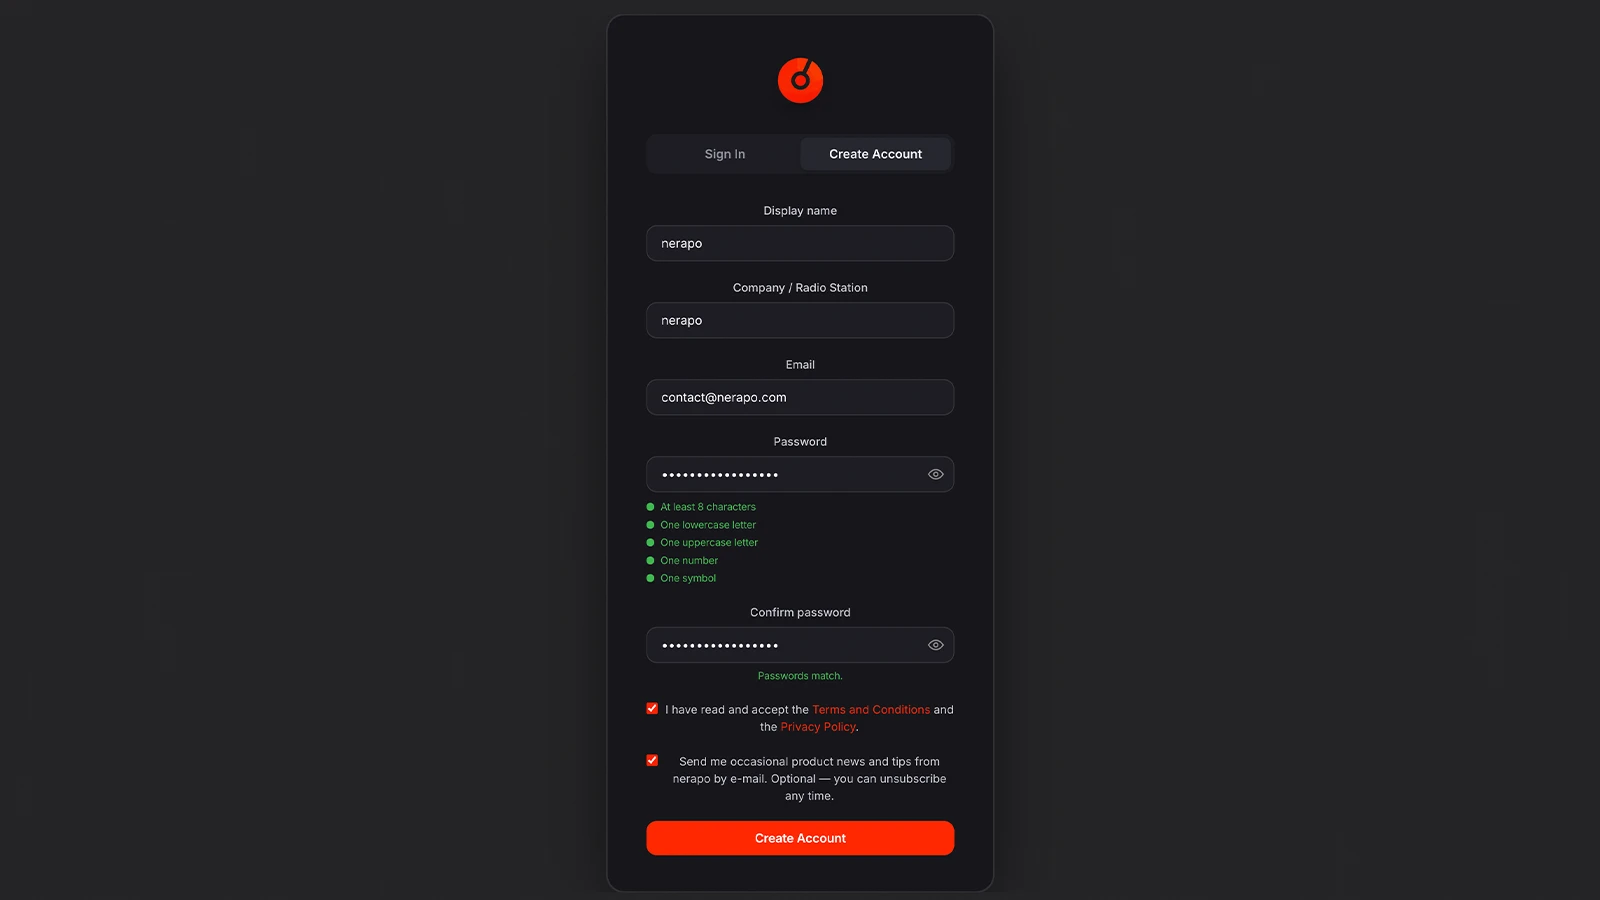
2Fill the form and accept the legal docs
Display name, email, password. Live validation rules under the password field turn green as you go. Tick the Terms + Privacy checkbox. Click Sign up.
3Check your inbox
A verification email arrives from [email protected] within seconds. If not in two minutes, check spam. Whitelist the address so future emails don't end up there.
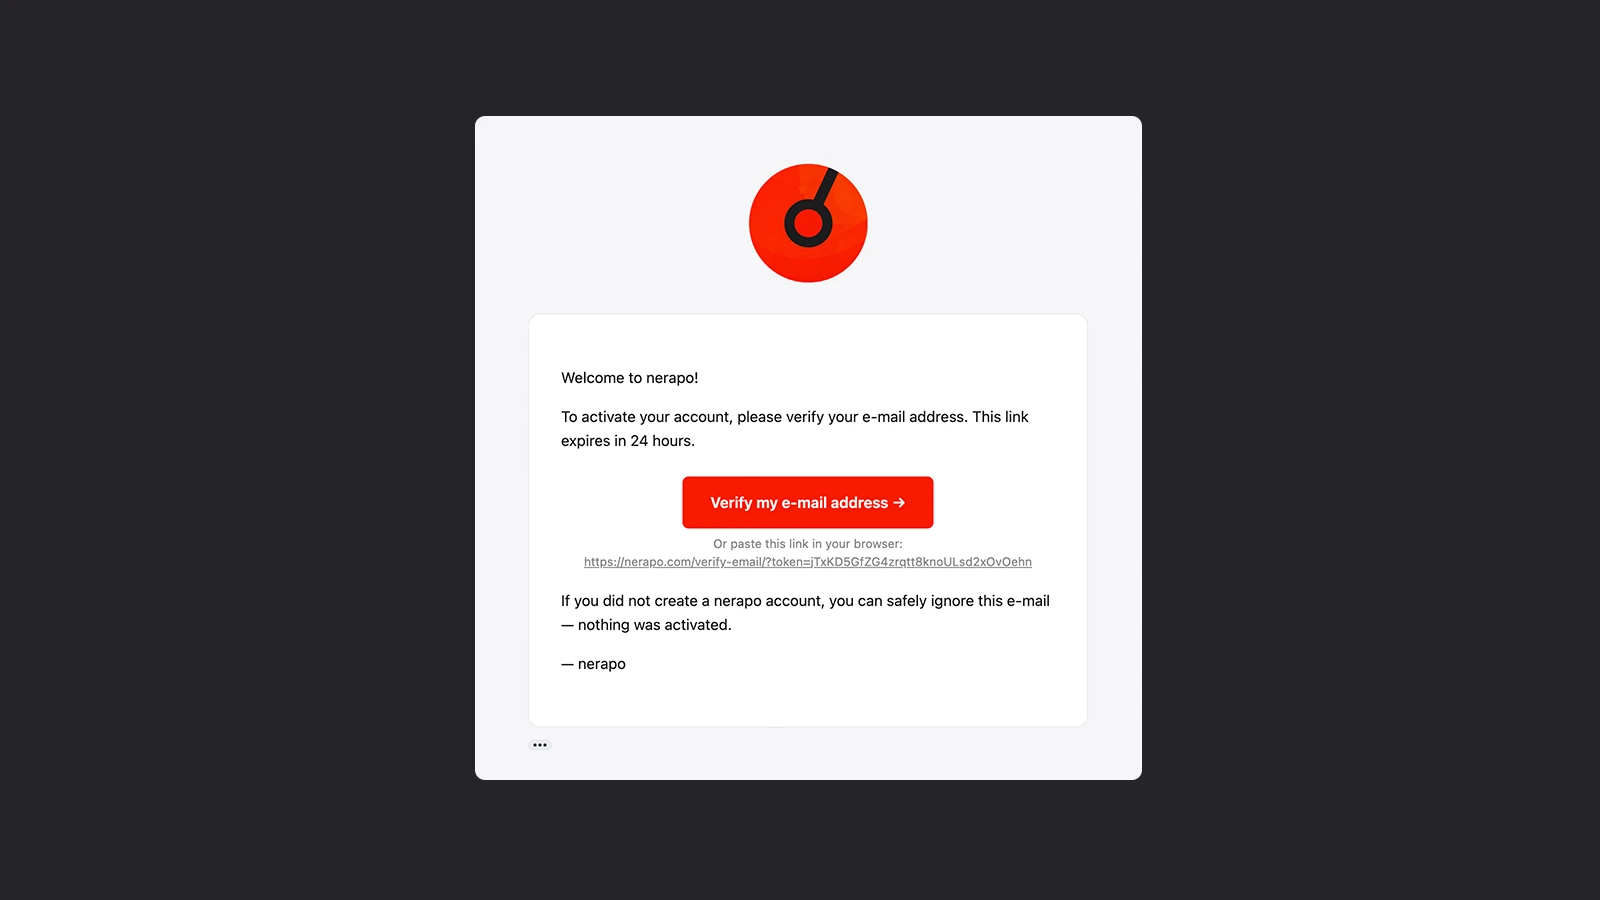
4Click Verify my email
The link redirects you back to nerapo, you land on the welcome screen with pricing.
- Email never arrives: almost always in spam. Whitelist
[email protected]. - "Email already in use": the address is registered. Use Sign in instead, or reset the password.
- Password rules won't all turn green: the symbol rule is the one people miss most. Any of
!@#$%&*works. - Verification link expired: good for 24 hours. After that, sign in normally and nerapo sends a new one.
Recap
- Sign-up needs: display name, email, password, accept legal docs.
- No credit card here — that's the next step.
- A verification email is required to activate the account; check spam if it doesn't arrive in 2 minutes.
- After verification you land on the welcome screen with pricing.
Choose a plan and pay via Stripe
You'll need: a verified nerapo account (step 01), and a card, Apple Pay, Google Pay, or Link.
1Pick platform and billing cycle
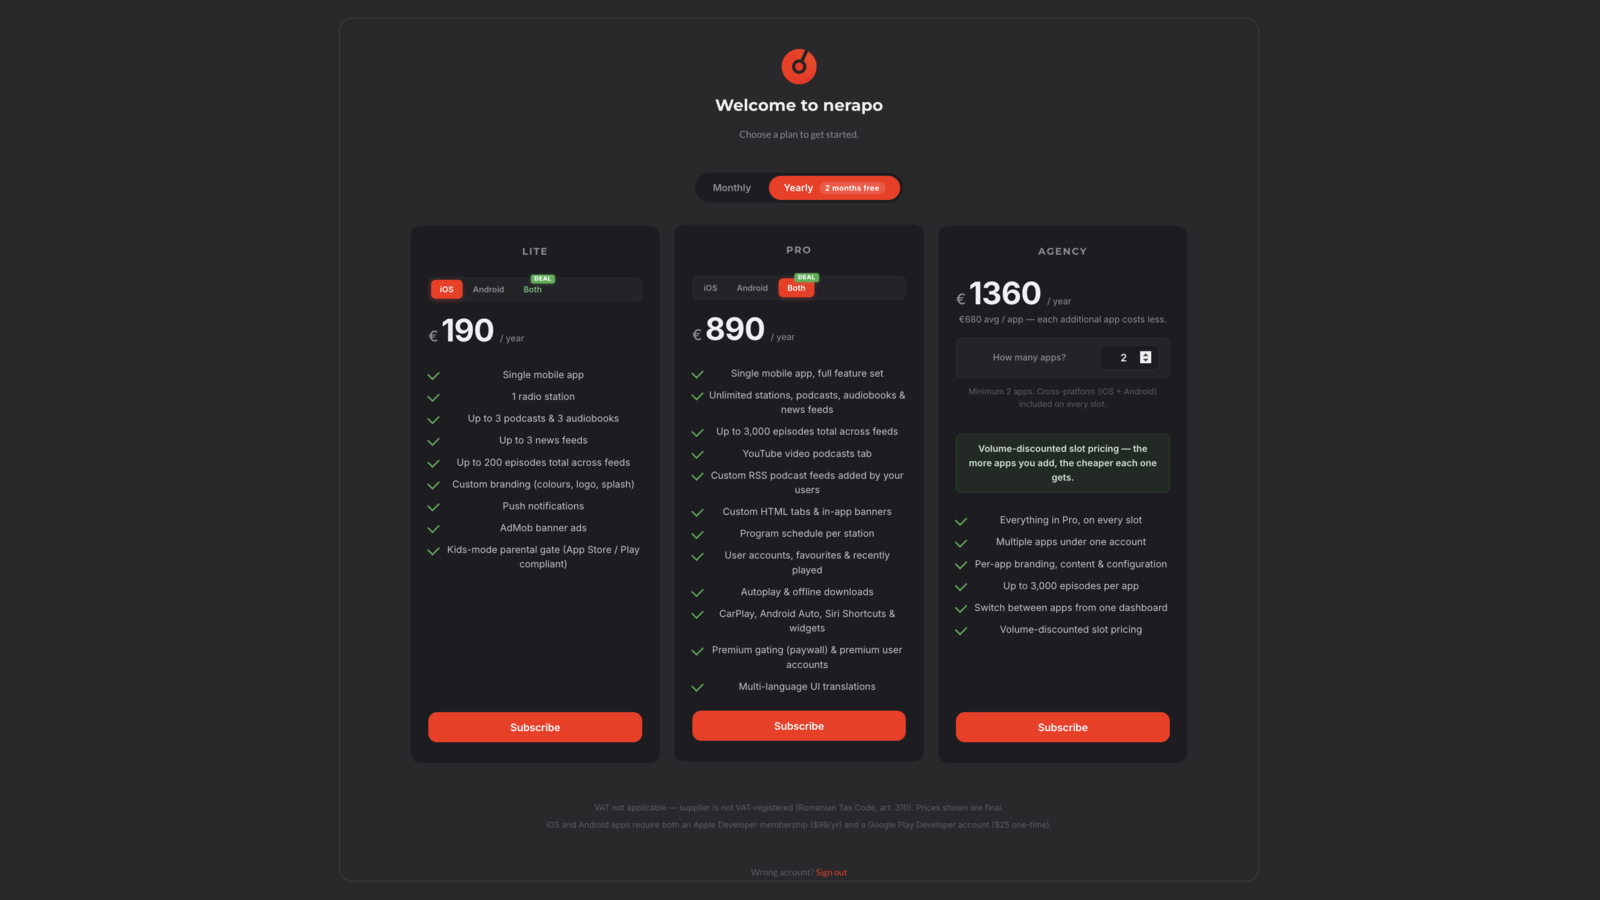
Two toggles at the top of pricing drive everything below. First picks platforms — iOS, Android, or Both. Both is cheaper than two single-platform subscriptions. Second picks Monthly or Yearly. Yearly gets you two months free.

2Pick a plan
Three columns. Lite is the cheapest, single station, no premium subscriptions. Pro adds premium content gating, custom HTML tabs, video podcasts, multi-language translations, more. Agency is for managing multiple apps — minimum 2 slots, graduated pricing (the more slots you add, the cheaper each one gets, floored at twenty-nine euros per slot).
Not sure which? Start on Lite. Upgrading mid-cycle is instant and prorated. Downgrades happen at the end of your current billing period. No lock-in.
3Stripe Checkout
Stripe takes over from here. Hosted page with your plan summary on the left and the payment form on the right. Card, Apple Pay, Google Pay, or Link — pick whichever's fastest. Stripe handles VAT and sales tax automatically based on your billing address.

4Land in the setup wizard
After Stripe confirms payment, you're sent straight into the 4-step setup wizard. Your subscription is active. Stripe emails you a receipt within seconds.
- Card declined: usually a 3D Secure prompt that didn't trigger. Try with your banking app open, or use a different card.
- Picked the wrong plan: not a problem. Upgrade or downgrade from Billing anytime.
- VAT looks too high: calculated from your billing address. Fix the address; the total recalculates live.
- Want to test the dashboard before paying: close checkout and visit nerapo.com/demo — full sandbox, no signup. The demo lasts 12 hours, then it self-destructs; you can spin up a fresh one anytime.
- Agency slider won't go below 2: by design. Agency requires a minimum of 2 slots.
Recap
- Two toggles at the top of pricing (platform, billing cycle) drive every plan's price.
- Three plans: Lite (entry), Pro (premium features), Agency (multi-app, min 2 slots).
- Stripe Checkout handles payment — card, Apple Pay, Google Pay, or Link.
- After payment you land directly in the setup wizard.
- Upgrade or downgrade anytime later from Billing.
The 4-step setup wizard
You'll need: active paid subscription (step 02). Four 1024×1024 PNG logos ready, and your bundle ID format decided.
1Step 1 — Name and tagline
First page asks for app name and tagline. Both required. Name shows under the launcher icon on the listener's phone — keep it under 24 characters to be safe on both stores. Click Continue.

2Step 2 — App identifier (Bundle ID / Package name)
Reverse-domain format, like com.yourcompany.yourapp. Lowercase, dots, no spaces. The globally unique identifier your app gets on both Apple's and Google's side — once it ships, it's effectively permanent. Pick something you can live with for years.

3Step 3 — Upload four 1024×1024 PNG logos
All four logos are 1024 by 1024 pixels, PNG, no other formats.
- Launch Logo — first frame of the intro animation. Usually a simplified outline.
- Main Logo — full logo. Used throughout the app.
- Default Artwork — fallback when an episode has no cover.
- App Icon — the home-screen icon. Apple rejects transparency, so use a solid background.
Click Upload on each tile, previews show right away. Click Finish Setup at the bottom.

4Step 4 — Done
"Setup complete" screen confirms everything is saved. Click Go to Dashboard — that's where every other video in this series picks up.

- Logo upload rejected ("must be exactly 1024 × 1024 px"): re-export at exactly that size. 1000×1000 won't do.
- Logo rejected ("Only PNG files accepted"): JPGs and WebPs are blocked. Use PNG. Transparent background for the first three; solid background for App Icon.
- Bundle ID rejected ("already used"): bundle IDs are globally unique across all nerapo customers AND on Apple/Google. Pick a different one.
- You picked the wrong app name: you can change it from Branding later, but a name change requires a fresh download + rebuild + republish.
Recap
- 4 wizard steps: name + tagline, identifier, four logos, done.
- All four logos are 1024×1024 PNG. Different roles, same dimensions.
- Bundle ID is reverse-domain and effectively permanent once you publish. Pick once, pick deliberately.
- After the wizard, the dashboard Overview opens.
Part 2 of 6 · 2 steps · ~14 minutes total
Part 2 — Developer accounts
Create your Apple Developer and Google Play Console accounts before opening the project in any IDE.
Apple Developer Program account
You'll need: a credit card. $99/year. Apple verification can take 24-48 hours.
1Sign up at developer.apple.com
developer.apple.com/programs. Sign in with an Apple ID. Click Enroll. Pick Individual or Organization (Organization needs a D-U-N-S number; Individual is simpler if you're solo).
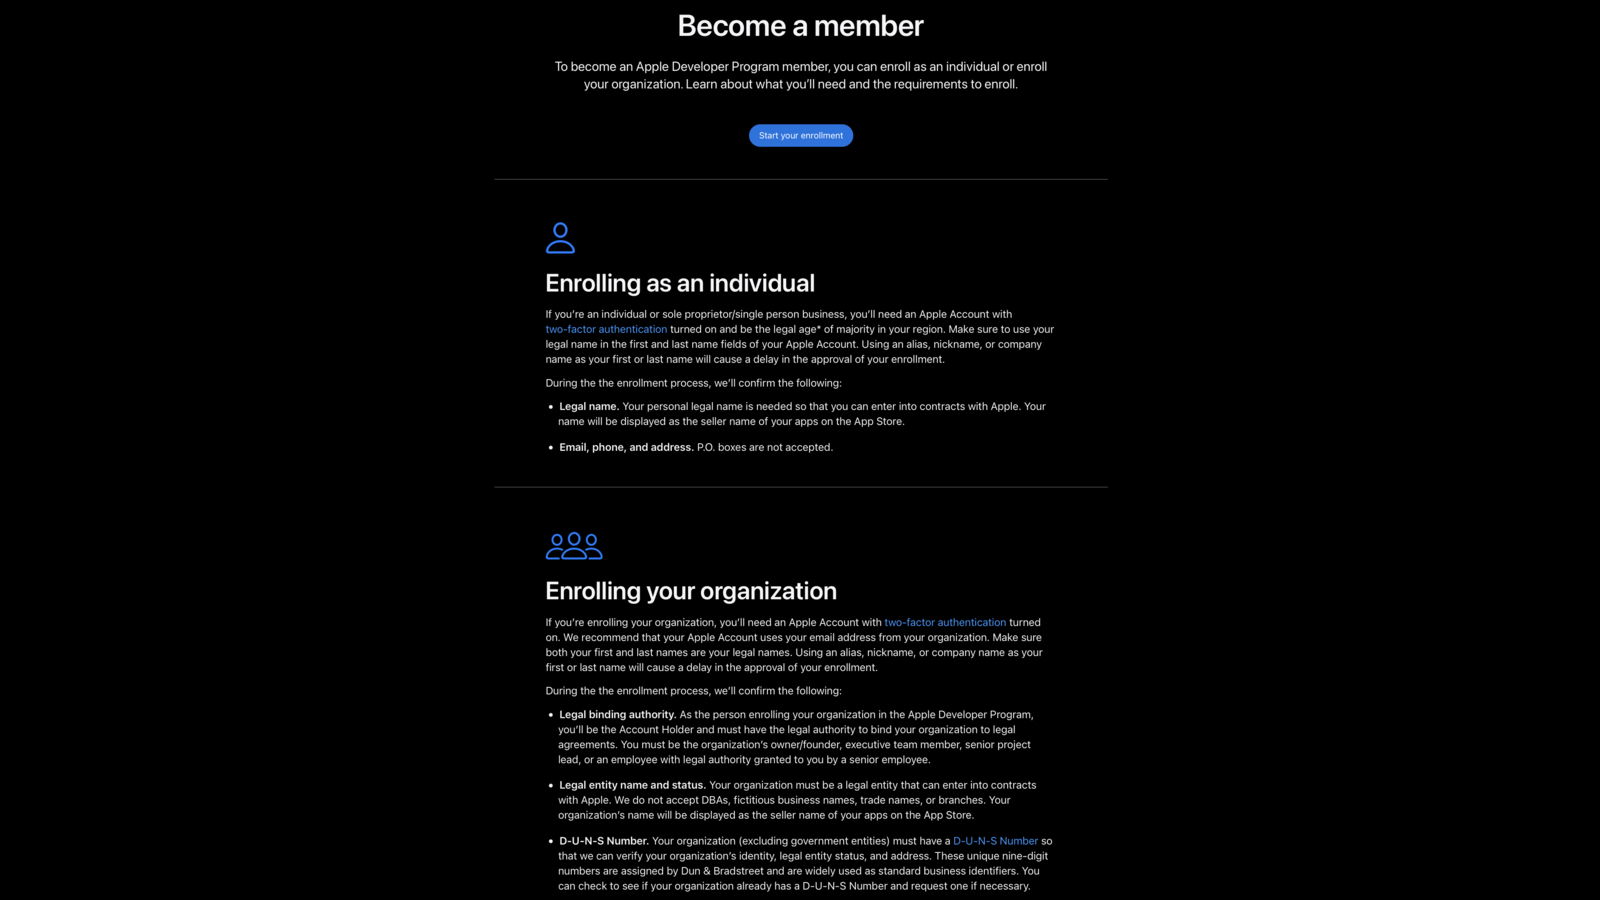
2Pay the $99 annual fee
Apple verifies your identity (24-48 hours typically). You receive an email when approved. After that, you have full access to App Store Connect, Certificates, and Identifiers.
3Create an App ID
developer.apple.com → Certificates, Identifiers & Profiles → Identifiers → +. Pick App IDs. Enter your nerapo iOS bundle ID. Tick capabilities you'll need (Sign in with Apple, Push Notifications). Register.

4Create the app in App Store Connect
appstoreconnect.apple.com → My Apps → +. Pick New App. Bundle ID dropdown shows the App ID you just created. Name, SKU (any internal string), primary language. Create.

- Apple rejects D-U-N-S as missing: Organization enrollment requires it. Get it free at dnb.com (takes 1-2 weeks for new orgs). Or enroll as Individual to skip.
- App ID name has special characters: Apple is picky. Letters, digits, dots only.
- $99 charge declined: some banks block international charges. Call your bank.
Recap
- $99/year. 24-48 hour verification.
- App ID with capabilities you'll need (Sign-In, Push).
- Create the App Store Connect entry next, picking the App ID.
Google Play Console + Android keystore
You'll need: a Google account, $25 one-time fee. Android Studio installed for keystore generation.
1Sign up at play.google.com/console
play.google.com/console. Sign in with a Google account. Pay the $25 fee. Verify your identity. Approval is faster than Apple — usually same day.

2Create your app entry
Apps → Create app. App name, default language, app type (App), free or paid. Acknowledge declarations (kids?, child-directed?). Click Create app.

3Generate an Android keystore
Android requires you to sign your release builds with a keystore. Generate one in Android Studio: Build → Generate Signed Bundle / APK. First time, click "Create new". Pick a path (KEEP THIS FILE SAFE), passwords, alias name, validity (10 000 days is fine).

4Enable Play App Signing (recommended)
Play Console → Setup → App integrity → App signing → Use Play App Signing. Google holds the canonical app signing key for you, you upload with your local key. Big win: you can recover if you lose the local key. (Steps 25 + 30 cover the SHA-1 implications.)
5Upload your first AAB to Internal testing
Play Console → Release → Testing → Internal testing → Create new release. Upload your signed AAB (built from the nerapo Android ZIP, covered in step 07). Activate the release. Internal testing publishes within minutes.
- Lost the keystore file: with Play App Signing, recoverable. Without it, you can never publish updates to the same listing — have to publish as a new app. SAVE THE FILE.
- Keystore passwords forgotten: same issue. Store them in a password manager.
- $25 charge declined: some banks block Google Play. Call them.
Recap
- $25 one-time. Same-day approval typically.
- Generate a keystore in Android Studio — save it forever.
- Enable Play App Signing for recoverability.
- Upload first AAB to Internal testing.
Part 3 of 6 · 2 steps · ~18 minutes total
Part 3 — Build and run
Open the downloaded project, sign it, and run it once on a simulator or a real device. The first launch unlocks every section of your nerapo dashboard.
Build iOS in Xcode and submit to the App Store
You'll need: Mac with Xcode 15+. iOS ZIP downloaded from nerapo Overview. Apple Developer membership active. App Store Connect entry created (step 04).
1Open the nerapo iOS project
Unzip the iOS ZIP. Double-click the .xcodeproj file. Xcode loads.

2Set Signing & Capabilities
Project navigator → click the project → Signing & Capabilities. Team: pick your Apple Developer team. Bundle Identifier: must match the App ID you registered in step 04. Provisioning profile: Automatic.

3Archive (Product → Archive)
Top menu Product → Archive. Xcode builds the release version, signs it, packages it. Takes a couple of minutes. Organizer window opens when done.

4Distribute App → App Store Connect
In Organizer, pick the archive, click Distribute App. Pick App Store Connect → Upload. Follow the wizard, signing and validation happen automatically. Upload completes in 5-10 minutes.
5Submit for review in App Store Connect
appstoreconnect.apple.com → your app → the new build appears under TestFlight after a short processing wait. Move it to the App Store version, fill out App Information (description, screenshots, age rating, privacy policy URL, app review info). Submit for Review. Apple review: typically 24-48 hours.

- "Provisioning profile doesn't include the Sign in with Apple entitlement": Sign-In wasn't enabled on the App ID. Step 24 covers it.
- Apple rejects with "App icon contains transparency": App Icon PNG had alpha. Replace with solid background in Branding, re-download.
- "Missing privacy policy URL": Apple requires one. Use the URL you set in Settings → Links & Contact → Privacy Policy URL.
Recap
- Download iOS ZIP, open in Xcode.
- Signing & Capabilities: your Team + bundle ID + automatic provisioning.
- Product → Archive → Distribute → App Store Connect.
- Submit for Review in App Store Connect, fill metadata.
- 24-48 hour Apple review.
Build Android in Studio and submit to Play
You'll need: Android Studio. Android ZIP from nerapo Overview. Play Console account active (step 05). Keystore ready.
1Open the nerapo Android project
Unzip the Android ZIP. Android Studio → Open → pick the unzipped folder. Wait for Gradle sync to finish (couple of minutes first time).
When you open the project, Android Studio will suggest updating or upgrading the Android Gradle Plugin (AGP), Gradle, the build files, and similar components. These updates are NOT required. Please ignore them.
If you accept them, the app may fail to compile.
nerapo always ships a working version of the app/zip and will provide updates whenever they're actually needed.
If you updated by mistake, no problem — just go to your Dashboard and re-download the zip.

2Build → Generate Signed Bundle / APK
Top menu Build → Generate Signed Bundle / APK. Pick Android App Bundle (AAB — Play prefers this over APK now). Pick your keystore file, enter passwords, pick the release alias.

3Pick release build variant
Variant: release. Tick V1 + V2 signing if asked. Output folder: anywhere; usually app/release/. Click Create. Studio builds the signed AAB — takes 1-3 minutes.
4Upload the AAB to Play Console
play.google.com/console → your app → Production → Create new release. Upload the AAB. Add release notes ("Initial release" works). Save, Review release, Start rollout to Production.

5Fill the store listing + submit for review
Play Console → Main store listing. App name, short description (80 chars), full description, icon, feature graphic, screenshots, categorization, contact details, privacy policy URL. Then Policy → App content for the questionnaires. Submit. Google review: typically 1-7 days.
- "You're uploading an APK to a release that supports AAB": use AAB format. Play deprecated APK uploads for new apps.
- Gradle sync fails with "SDK location not found": Android Studio needs the SDK path set. File → Project Structure → SDK Location.
- Google rejects with "Missing target audience": Policy → App content → Target audience questionnaire isn't done. Fill it.
Recap
- Open Android ZIP in Android Studio.
- Generate Signed AAB with your keystore.
- Upload to Production track in Play Console.
- Fill store listing + content rating + target audience.
- 1-7 day Google review.
Part 4 of 6 · 20 steps · ~124 minutes total
Part 4 — Dashboard configuration
With your app running, configure everything from the dashboard, in sidebar order.
Dashboard overview tour
You'll need: wizard finished (step 03). This is a guided tour, nothing to configure.
1Two zones: sidebar and content
Two columns. Left is the sidebar. Right is the content panel — where every section opens. On mobile, the sidebar collapses to a top bar with a hamburger menu.

2The app switcher (top-left of the sidebar)
At the top-left of the sidebar header: your app's name, the nerapo logo, and a small chevron next to "powered by nerapo". The chevron only appears when you're on Agency (or about to add a second app). Clicking opens a dropdown listing all your apps plus an "Add new app" button. Single-app plans see only the brand block. Below the brand block, your plan badge (Lite, Pro, Agency). For Agency, also the slot counter.
3The sidebar's three buckets
Everything below the brand block is grouped into three section headers — Content, Customization, Account — top to bottom.
Content holds everything end-users hear or see — Overview, Stations, Podcasts, Audiobooks, Videos, News, AdMob Ads, Banners.
Customization holds how the app looks and behaves — Branding, Settings, Push Notifications, Push & Sign-In, Translations, User Data Requests.
Account is your billing and profile — Billing, Account, Sign Out at the bottom.
Items locked by your plan are hidden — Videos and Banners are Pro+, Translations is Pro+, and so on. Up to 17 items total when everything is unlocked.

4Locked items + the save pattern
Right after the wizard, most Content and Customization items are greyed out with a small padlock. They unlock automatically the first time your built app runs on a device and registers its bundle ID. Until then, Overview is the only fully open item — and that's where you download the app to make this happen.
Almost every section follows the same pattern — fill in fields, click Save at the bottom, a green toast confirms. No autosave by design. Your save ships live to installed apps via the next config refresh — about five minutes for backgrounded apps, instantly when a listener opens the app fresh. The only sections that need a rebuild instead of shipping live are launcher icon, app name (the home-screen label), and translations.
- Sidebar item greyed out with padlock: you haven't downloaded + run the app on a device yet. Use the Download buttons on Overview, build on a device, return to nerapo. Sections unlock automatically.
- Sidebar item missing entirely: your plan doesn't include it. Videos, Banners, Translations, User Data Requests, paywall-related items are Pro+.
- App switcher chevron isn't there: you're on a single-app plan. Only Agency sees the multi-app switcher.
- You changed something but the test device shows the old value: force-close the app and reopen. Cold start always fetches fresh config.
Recap
- Two zones on desktop: sidebar left (272 px), content panel right. Mobile collapses to top hamburger drawer.
- App switcher lives top-left, inside the sidebar header. Only interactive on multi-app plans.
- Sidebar has three buckets: Content, Customization, Account. Up to 17 items total.
- Locked items unlock automatically after the app's first device launch.
- Saved changes ship live via config refresh (~5 min, or instant on cold start). Launcher icon, home-screen app name, and translations are the only ones that need a rebuild.
Stations — add your first radio stream
You'll need: a working stream URL (Icecast, Shoutcast, or an HLS .m3u8). Test it in VLC first if unsure it plays.
1The Stations page
Counter "N out of M stations" on the left, + Add Station button on the right. Below: empty state or a table with Name, Stream URL, Category, Order, and per-row Edit / Schedule (Pro+) / Delete.

2Add Station modal
Two required fields: Name and Stream URL. Then the optional ones — station logo (PNG/JPG, 512 × 512, max 3 MB), category, country, website, description. Lower Sort Order floats higher in the list.

3Now Playing API URL (HLS only)
Icecast and Shoutcast send the current song title inline with the audio. HLS doesn't, so the app needs a separate endpoint. On AzuraCast: https://your-server.com/api/nowplaying/station_slug. Leave empty for plain Icecast/Shoutcast.
4Save Station
Save closes the modal, the station appears in the table. Demo phone preview shows it immediately; installed apps pick it up on next config refresh.
- Plays in browser but app says "Cannot connect": the URL must be HTTPS. Apple and Google block insecure streams.
- HLS plays but Now Playing stays blank: you need the Now Playing API URL.
- Logo pixelated: re-export at exactly 512 × 512.
- You added a second station on Lite: Lite is single-station. Upgrade to Pro.
Recap
- Counter + Add Station button on top, table below.
- Required fields: Name and Stream URL.
- Logo is 512 × 512 px PNG or JPG, max 3 MB.
- Now Playing URL is for HLS streams.
- Schedule (Pro+) opens as a modal from the station row — not a sidebar item.
Per-station program schedule
You'll need: Pro or Agency plan. At least one station added (step 09).
1Schedule is opened from Stations, not the sidebar
Schedule is not a sidebar item. It opens as a modal from the per-station row on the Stations page — each station has its own independent schedule.

2Day tabs + "Show Now On Air" toggle
Toggle at the top: "Show Now On Air in player" — displays the current programme below the track title in the live player. Seven day tabs across: Sun, Mon, Tue, Wed, Thu, Fri, Sat (Sunday first because that's how the date math works). Default highlighted: Monday.

3Add a programme (inline form)
Click +Add. An inline form slides into view below the day panel. Programme Name (required, max 255), Day (defaults to the tab you're on but pickable), From and To (time inputs), Description (optional, max 120). Save Programme writes immediately.
4Copy / Paste a whole day
Copy button grabs all of a day's programmes. Switch to another day tab, a "Paste [day name]" button appears. Click Paste, confirm — target day's programmes get replaced. Useful when Mon-Fri share the same schedule.
- No Schedule button on the station row: Lite. Upgrade.
- "Show Now On Air" is on but player shows nothing: current time doesn't fall inside any programme. Add one covering the current time.
- Paste replaces the target instead of merging: by design. To merge, copy individual programmes.
Recap
- Schedule is a modal opened from the Stations row. Pro+ only.
- Toggle: "Show Now On Air in player".
- Day tabs Sun → Sat, Monday default.
- Add Programme is inline: Name, Day, From, To, Description.
- Copy / Paste clones a whole day (replaces, doesn't merge).
Podcasts and Audiobooks (from RSS feeds)
You'll need: one public podcast or audiobook RSS feed URL.
1Page overview + 30-min auto-refresh
Top of the page: green notice — "Episodes are refreshed automatically every 30 minutes. Use the Refresh button to force an immediate update." Two counters (feeds budget + episode-count budget), + Add Podcast button on the right.
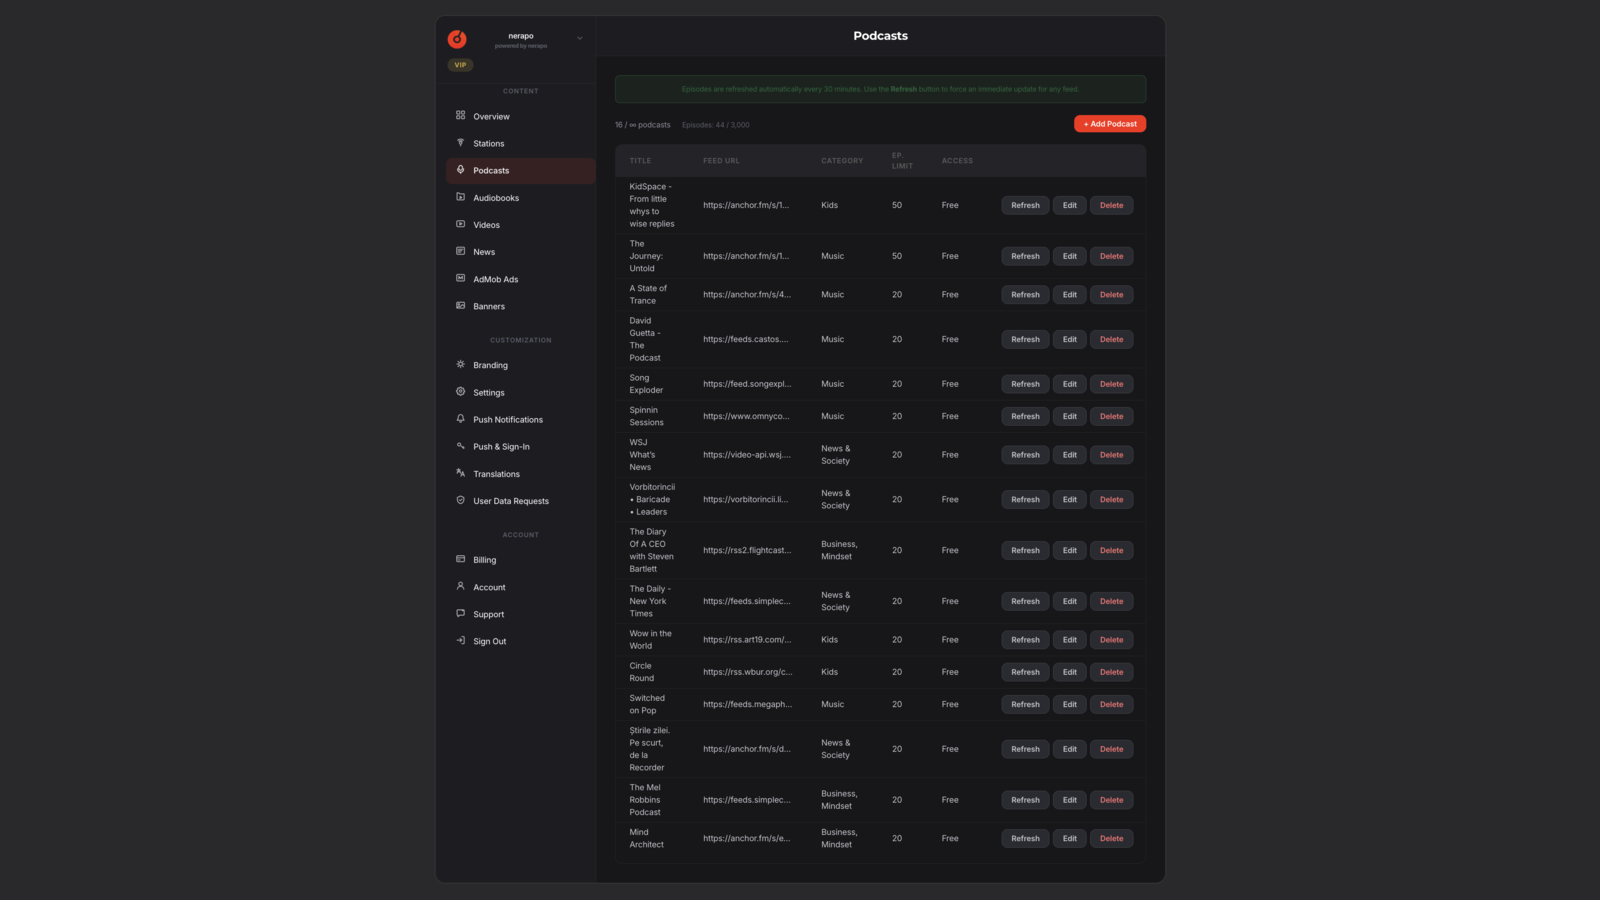
2Add Podcast modal
Title and RSS Feed URL required. Cover image (1400 × 1400 PNG/JPG, used only when an episode has no cover of its own). Episode Limit default 50, hard max 200. Author, description, category, language (ISO code).

3Access, Sort Order, Made for Kids, Offline download
Access dropdown: Free or Premium (Pro+). Sort Order is a number. Made for Kids shows a Kids badge in the app and groups audiobooks into the Kids section — it's a labelling flag, not a parental gate. Allow offline download (Pro+, on by default) comes with a copyright warning — only enable if you hold the rights.
4Save + Audiobooks tab
Save Podcast: nerapo fetches the feed, parses the first batch of episodes, saves the show. Auto-refresh every 30 minutes from then on; per-row Refresh forces immediate. The Audiobooks tab uses the same form — the show just lands in the Audiobooks tab of the app instead.
- "Feed could not be parsed": usually a malformed RSS or a feed behind authentication.
- Cover never shows in the app: the feed's per-episode cover overrides your upload. Your fallback only kicks in when an episode has no cover at all.
- Offline download missing on Lite: Pro+ only. Upgrade from Billing.
Recap
- Podcasts and Audiobooks use the same form; different sidebar tabs in the app.
- Required: Title + RSS Feed URL.
- Cover is 1400 × 1400 PNG/JPG fallback only.
- Episode limit default 50, hard max 200.
- Made for Kids = badge + grouping. Offline download = Pro+, copyright is yours.
- Episodes auto-refresh every 30 minutes.
Videos (YouTube video podcasts)
You'll need: Pro or Agency plan. One or more public YouTube video URLs.
1Inline form, not a modal
Different from Stations or Podcasts. Inline form at the top of the page, list of video podcasts below. Per-row Edit populates the same form. Cover image must be square (1400 × 1400 recommended); the app crops to a 1:1 tile.

2Add YouTube videos — 3 URL shapes
One URL field with an Add button. Paste, click Add — nerapo verifies the video exists, is public, and isn't region-blocked. Three accepted shapes: youtube.com/watch?v=..., youtu.be/..., youtube.com/shorts/.... Embed, v-slash and live URLs aren't supported.

3Access + Kids-safe
Access dropdown: "Free — all listeners" or "Premium — paid subscribers only". Kids-safe content toggle adds a Kids badge in the app. Like with podcasts, this is a labelling flag, not a parental gate.
4Save video podcast
Save adds the show to the list below the form. Drag handles let you reorder videos within a show. Videos with embedding disabled by the uploader get added too — the app shows a "Watch on YouTube" button instead of inline playback.
- "Video could not be verified": private, deleted, or region-blocked. Try another URL.
- Cover gets cropped: use a square (1:1) image. nerapo warns on upload but allows save.
youtube.com/embed/...rejected: only watch, youtu.be, and shorts URLs work. Use the public share URL.- Videos sidebar item missing: your plan doesn't include it. Upgrade to Pro.
Recap
- Pro+ only. Inline form at top, list below.
- Identity + cover (square, 1400 × 1400) + per-URL add with live verification.
- Three accepted URL shapes:
watch?v=,youtu.be/,/shorts/. - Free vs Premium dropdown for access gating.
- Kids-safe is a badge flag, not a parental gate.
News (RSS news feeds)
You'll need: one or more public RSS news feed URLs (BBC, Reuters, your own WordPress site, etc.).
1One settings form, no modal
Unlike Stations or Podcasts, News doesn't have a table. It has one form — feed URLs textarea, fallback image, refresh interval, two save buttons. That's the whole page.

2RSS Feed URLs textarea
Six-line textarea. One URL per line. The number you can add depends on your plan — the label tells you. nerapo reads each one and merges them into a single news tab in the app.
3Fallback Image + Refresh Interval
Fallback Image: PNG/JPG, 1200 × 630 px recommended, max 3 MB. Used when an article in the feed has no image. Refresh Interval: default 30 minutes. Minimum 5, max 1440 (24 hours).

4Save News Settings + Clear News Cache
Two buttons. Save News Settings ships the new config live. Clear News Cache wipes cached feed data and forces a fresh fetch on the next refresh — useful when you've just changed the feed URLs.
- "Feed could not be parsed": typo or private feed. Open it in a browser, should show XML.
- Articles show no images: the feed doesn't embed per-article images. Your fallback fills the gap.
- News doesn't update on the test device: refresh interval is the dashboard setting. Hit Clear News Cache to force.
Recap
- One settings form, no modal. RSS URLs textarea + fallback image + refresh interval.
- Default refresh is 30 minutes. Min 5, max 1440.
- Fallback image is 1200 × 630 PNG/JPG.
- Save News Settings + Clear News Cache buttons.
In-app promotional banners
You'll need: Pro or Agency plan. One banner image ready.
1The Banners page
+ Add Banner button on the right, empty state or a table below. Columns: Preview, Link, Title, Order, plus per-row Edit and Delete. No counter — Pro and Agency both let you add as many as you want.
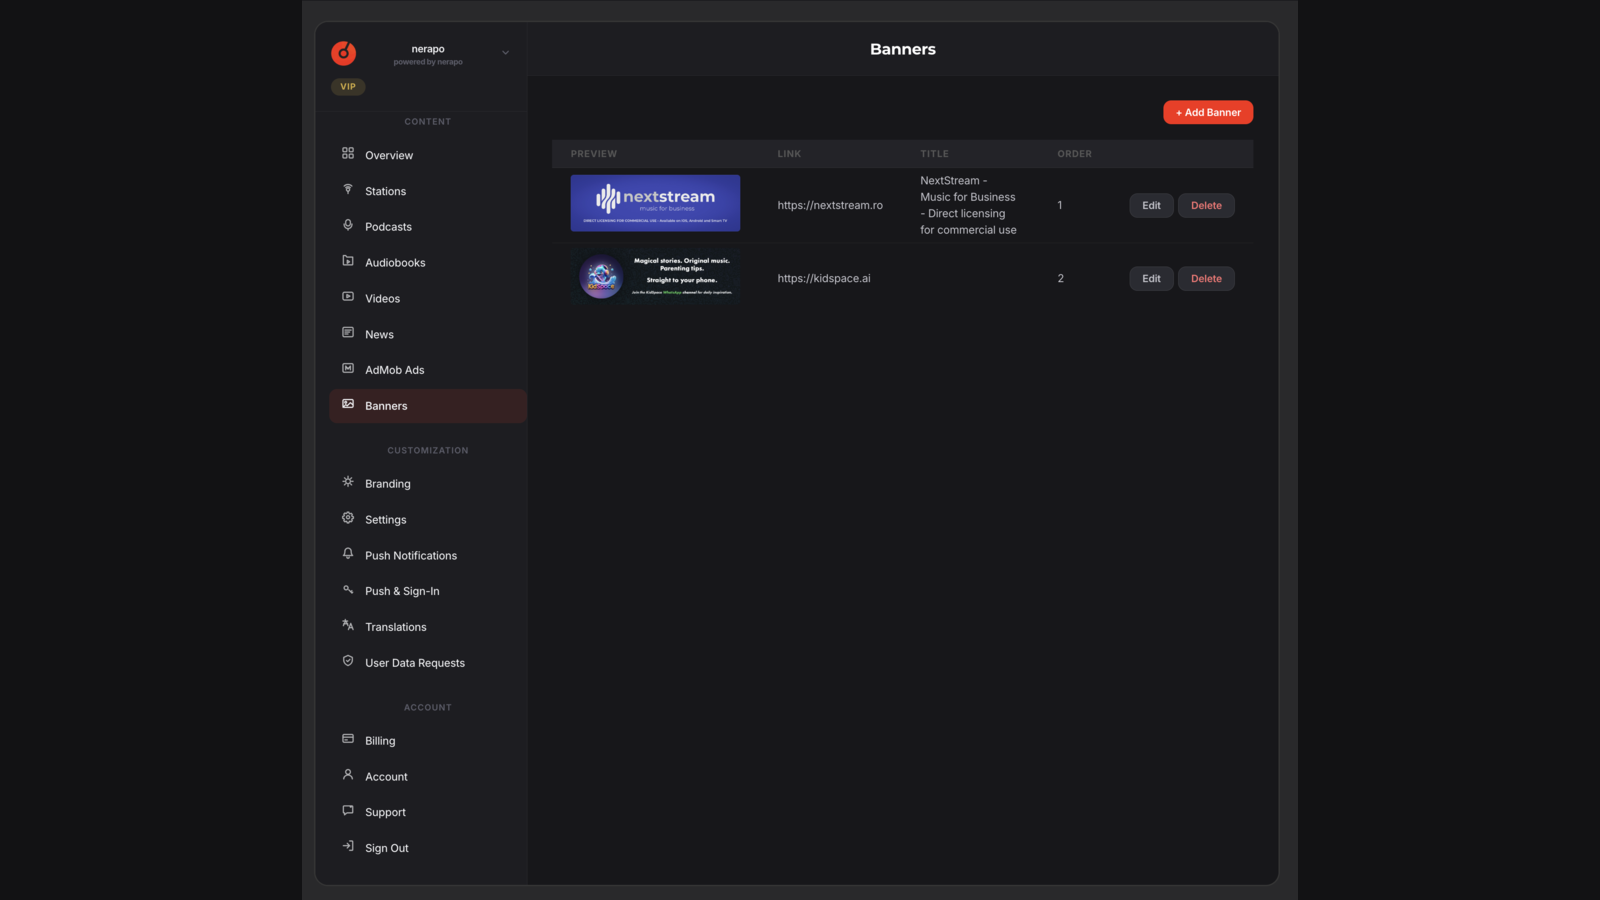
2Add Banner modal
Five fields, one required. Banner Image (PNG/JPG, 1200 × 400 recommended, max 3 MB). Optional: Link URL (where the banner takes the listener on tap), Title (accessibility), AdMob Unit ID override, Sort Order.

3Save Banner
Save closes the modal, banner appears in the table. Demo phone preview reflects it immediately, installed apps pick it up on next config refresh.
- Banner cropped or stretched: use 1200 × 400 px.
- Tap doesn't open the linked URL: URL must start with
https://. - AdMob banner override doesn't show: the unit ID must match the platform (iOS unit for iOS app, Android unit for Android).
- Lite plan can't access Banners: Pro+ only.
Recap
- Banners are Pro+ only.
- Required: image (1200 × 400 px PNG/JPG).
- Optional: link URL, title, AdMob unit ID override, sort order.
- No counter, no per-plan limit (within reason).
AdMob setup — banner ads for free users
You'll need: a Google account. Free for sign-up. Ads only show to free listeners; premium subscribers are always exempt.
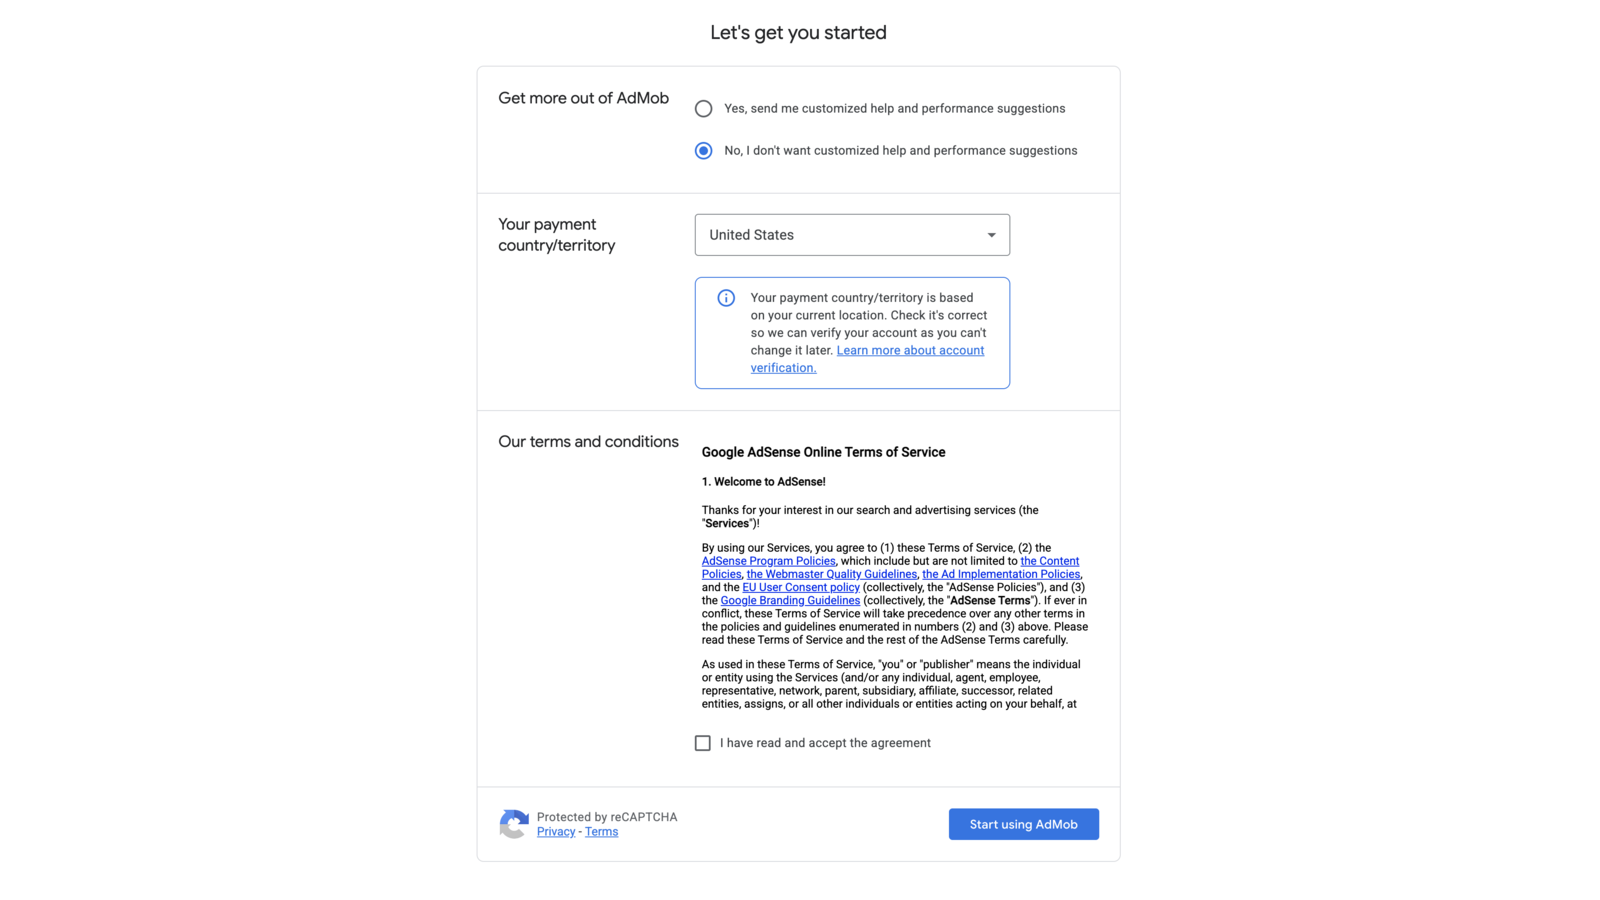
1Sign up for AdMob
admob.google.com. Sign in with your Google account. Accept terms. Land on the AdMob dashboard.
2Add your app to AdMob
Apps → Add app. Each platform you publish to needs its own AdMob app entry — iOS app and Android app are registered separately and get different App IDs. If you publish on both, repeat this step twice: once with platform "iOS", once with "Android".
Has your app been published? Pick "No" if pre-launch. Name each entry to match your nerapo app (e.g. "MyRadio iOS", "MyRadio Android"). AdMob generates a unique App ID per platform (looks like ca-app-pub-xxxxxxxxxxxxxxxx~yyyyyyyyyy - note the tilde).

3Create a banner ad unit
Inside each AdMob app → Ad units → Add ad unit. Pick Banner format. Name it (e.g. "In-app banner"). AdMob generates an Ad unit ID (looks like ca-app-pub-xxxxxxxxxxxxxxxx/zzzzzzzzzz - note the slash). Repeat with Interstitial format if you want fullscreen interstitials too. Both ad-unit types are per-platform — create them once inside the iOS AdMob app and once inside the Android AdMob app. The IDs are not interchangeable between platforms.

4Paste into nerapo AdMob Ads page
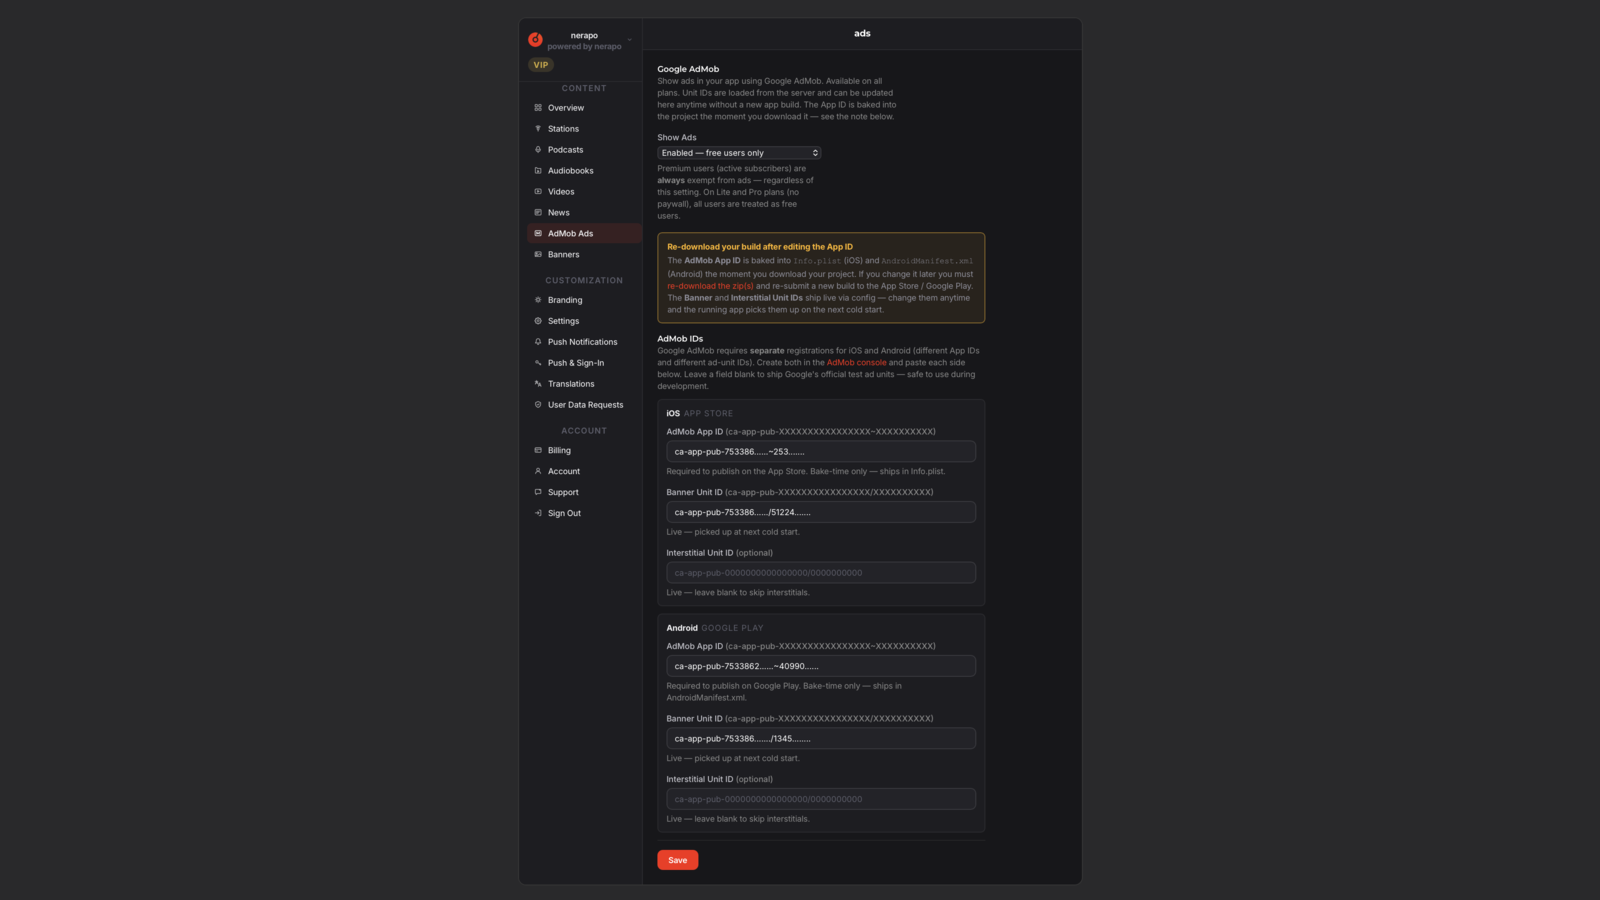
Dashboard sidebar → AdMob Ads. Show Ads dropdown: pick "Enabled — free users only" (premium subscribers are always exempt).
The Ads page shows two cards: iOS and Android (or just the card for your plan's platform if you only publish to one). In each card paste: App ID (with the ~), Banner Unit ID (with the /), and Interstitial Unit ID (with the /).
Make sure each platform's IDs go into the matching card — iOS IDs in the iOS card, Android IDs in the Android card. Save.
5How updates roll out — bake-time vs live
Two different update paths depending on which field you change:
App ID (bake-time): baked into iOS and Android the moment you download your zip. If you change the App ID after publishing, you must re-download the zip from the dashboard, rebuild the project, and re-submit a new build to the App Store and Google Play. Old installed apps keep using the old App ID until users update.
Banner Unit ID and Interstitial Unit ID (live): ship via config refresh. Change them in the dashboard, save, then force-quit the app on a test device and reopen — the SDK picks up the new IDs on the next cold start. No rebuild, no re-submit.
Free listeners see banner ads on Stations, Podcasts, News, Videos screens. Premium listeners see none. Kids mode adds TFCD + TFUA flags to ad requests for family-safe ads (Step 19).
- Ad unit ID and App ID swapped: App ID has
~, Ad unit ID has/. They go in different fields. - App still under AdMob review ("Getting ready" status): normal for new apps, can take a day. Ads start serving once approved.
- Test ads show but live ads don't: AdMob serves Test ads when running through the AdMob test mode. Real ads come once a real listener installs the published build.
- Banner shows on Lite even after a listener "subscribes": Lite plan has no premium paywall — every listener is treated as free, all see ads regardless of any subscription state. Pro and Agency unlock the paywall: on those plans, premium subscribers are automatically exempt from ads.
- No ads visible at all regardless of plan: the Show Ads dropdown at the top of the Ads page is the master switch. When set to Off, no banners and no interstitials serve to anyone, on any plan — Lite, Pro, Agency, VIP, all included. The dropdown wins over everything else: paywall, kids-mode, plan tier. Toggle it back to Enabled — free users only when you want ads to run again.
- iOS App ID pasted into Android card (or vice versa): AdMob rejects ad requests when the App ID doesn't match the platform reporting them. Symptom: "no fill" silently, zero ads, zero revenue. Double-check each card has its matching platform's IDs.
- App ID changed but no fresh zip downloaded: App ID is baked at download time, not live. Old downloaded zip files still contain the old App ID. After changing it, always re-download the zip from the dashboard before you rebuild in Xcode / Android Studio.
Recap
- AdMob serves banner ads to free listeners only.
- Premium subscribers always exempt.
- App ID (with ~) + Banner Unit ID (with /) into nerapo AdMob Ads page. → NEW: Two AdMob apps required for cross-platform plans: one iOS, one Android. Different App IDs and different ad-unit IDs per platform — paste them in the matching card on the Ads page.
- Show Ads = Enabled — free users only.
- Kids mode adds TFCD + TFUA flags — family-safe ads.
- Both IDs ship LIVE via config refresh. Force-quit + reopen on first set so AdMob initialises with the new values. → NEW: Banner + Interstitial Unit IDs ship LIVE — force-quit and reopen to pick them up. App ID is baked into the zip — changing it after publish requires a fresh zip + rebuild + re-submit to the stores.
Branding — logos, colours, app name
You'll need: dashboard unlocked (step 08). The wizard already collected the four logos and app name; this is where you change them later.
1App name and About text
Two text fields at the top. App Name is what shows inside the app — header, welcome screen, account panel. Change it here and the next config refresh ships the new name to installed apps. The text under the home-screen icon is different — baked into the build, so changing it requires a re-download and re-publish. About Text is the short paragraph in the About section.

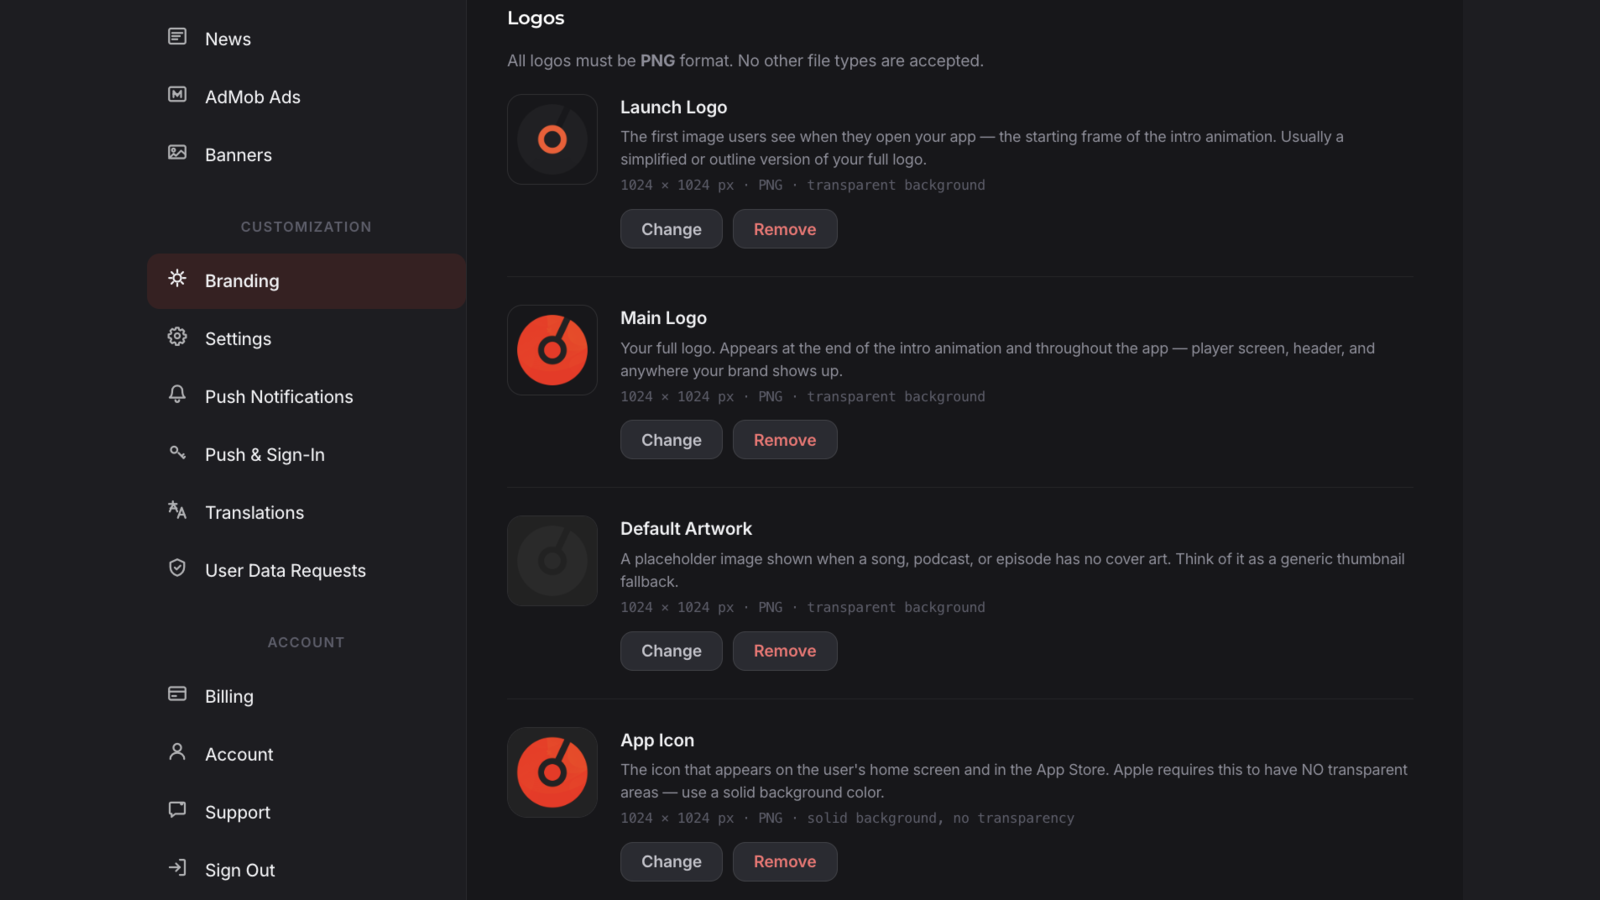
2The four logos (same as the wizard)
Same four 1024 × 1024 PNGs from the wizard. You can replace any of them here. Launch Logo, Main Logo and Default Artwork ship live via config refresh. App Icon is the one exception — the icon on listeners' phones only changes after you re-download, rebuild, and re-submit.
3The five colours
Five colour pickers, each with a swatch and a hex field. Defaults: Primary red #f71a00, Accent #FF9500, Background #171719, Card #242427, Text #FFFFFF. Primary drives buttons and active tabs. Accent is the secondary highlight. Background, Card, Text are the surface stack. All five ship live.

4Save Branding
Click Save Branding at the bottom. Green toast, you're done. No autosave — intentional, so you can experiment without affecting your live app until you're happy. App Icon change ships with your next build, everything else hits installed apps via config refresh.
- Upload "file too large": limit is 3 MB. Compress in Photoshop or any online compressor.
- App Icon shows transparent on dark backgrounds in the store: Apple/Google reject transparent icons. Re-export with a solid background.
- You changed the app name but the home-screen label still shows the old one: that label is baked into the build. Re-download, rebuild, re-publish.
- Test device still shows old branding: force-close and reopen. Cold start fetches fresh config.
Recap
- Three blocks: App identity (name + about), Logos (4 slots, all 1024 × 1024 PNG), Colours (5 pickers).
- App name in the app's UI, the first three logos, and all five colours ship live via config refresh.
- App Icon and the home-screen-icon label are baked into the build — they need a fresh download + re-publish.
- Save Branding at the bottom, no autosave.
Settings (the big page — 7 cards)
You'll need: dashboard unlocked. Some cards (HTML Views, paywall, User Custom Podcasts) are Pro+.
1Sticky in-page nav + 7 cards
One page, seven cards. Sticky bar at the top: App Menu, HTML Views, Features, Monetization, User Podcasts, Cache, Links. Click any to jump there.

2App Menu + Features
App Menu: drag-reorder the bottom tab bar. Built-ins and HTML tabs interleave freely. Per-row edit panel for custom labels and icon overrides. Carousel source dropdown at the bottom.
Features: 5 toggles. Autoplay, Offline downloads (Pro+, copyright warning), In-app search, CarPlay / Android Auto (Pro+), App made for kids (all plans — parental gate + AdMob TFCD/TFUA flags).

3Monetization + User Custom Podcasts + Cache
Monetization (Pro+): Content Access dropdown — "Premium content requires a subscription" or "Everyone gets free access (paywall disabled)". When paywall is on, iOS and Android IAP product ID fields appear, plus 5-min collapsible setup guides per platform. Sign-in setup moved to the Push & Sign-In page.
User Custom Podcasts (Pro+): let listeners add their own RSS feeds. Three modes: Off, On for all, On for premium only (Agency).
Cache: TTL in seconds. Default 60. Bump to 300 if you have lots of users.
4Links & Contact + Save
Links & Contact: social URLs (Website, Facebook, Instagram, X, TikTok, YouTube) with drag-reorder. Privacy Policy URL + Terms URL (load in the app's About). Support email used for every Contact button.
Big red Save settings button at the bottom commits everything from all seven cards. Sticky version follows you as you scroll.

- Drag-reorder didn't save: drop has to settle before scrolling. Re-drag.
- Toggle greyed out: plan-locked.
- IAP product ID set but paywall fails: product needs to exist + be active on the store, and your published app needs to have been built AFTER the IDs were saved.
- Cache TTL set very low and app feels slow: every TTL expiry triggers a refetch.
Recap
- One Settings page, seven cards, one Save button.
- App Menu: drag-reorder tabs (HTML tabs interleave), per-tab overrides, carousel source.
- HTML Views: see step 18.
- Features: autoplay, offline (Pro+), search, CarPlay (Pro+), kids mode (all plans).
- Monetization: paywall on/off + IAP product IDs (Pro+). Sign-in moved to Push & Sign-In.
- User Custom Podcasts: bring-your-own RSS (Pro+).
- Cache TTL: default 60 s.
- Links & Contact: social drag-reorder, legal URLs, support email.
Custom HTML tabs (write your own tab content)
You'll need: Pro or Agency plan. Some HTML/CSS/JavaScript ready to paste.
1Where HTML Views lives
Not a sidebar item — it's a card inside Settings, about a third of the way down. Use the sticky in-page nav at the top of Settings to jump to it. The card shows existing HTML tabs as collapsible rows plus an Add HTML View button.

2Add HTML View — four inputs per tab
Click Add HTML View, a row appears expanded. Inputs: Enabled toggle, Title (3-8 chars works best), iOS icon (SF Symbol name), Android icon (Material Symbol name), and a big textarea for raw HTML.

3HTML content — NOT sanitised
Anything that works in a webpage works in the textarea — tags, a style block, a script block, CDN resources by full URL. Renders inside a WebView on the device. Critical: content is NOT sanitised. Whatever you type ships verbatim, so keep a working copy before experimenting.
4Drag the tab into any position + save
Scroll back to App Menu card at the top of Settings. Your new HTML tab appears alongside the built-ins (Home, News, Podcasts, Schedule, Account). Drag it anywhere in the list — HTML tabs can sit anywhere, not just at the end. Then Save Settings at the bottom commits everything together. Up to 5 HTML tabs per app.

- Tab appears but content is blank: malformed HTML or a JS error. Test in a browser first.
- External CDN resources don't load: URLs must be
https://. WebView blocks plain HTTP. - Icon shows as a question mark: typo in SF Symbol or Material Symbol name. Case-sensitive. iOS uses dots, Android uses underscores.
- Hit the 5-tab cap: Combine multiple use cases into one "More" tab with in-tab navigation.
Recap
- HTML Views lives inside Settings, mid-page.
- Each row has four inputs: Enabled, Title, icon_ios + icon_android, HTML content.
- Up to 5 tabs total. Pro+ only.
- HTML tabs can sit anywhere in the bar — drag in the App Menu card.
- HTML is NOT sanitised — full JS / CSS power, also full footgun potential.
Kids mode + parental gate
You'll need: dashboard unlocked. This is the toggle you need ON for any app whose primary audience is children — Apple Guideline 1.3 and Google Play Families policy require it.
1Where the toggle lives
Settings → Features card → "App made for kids" (with a STORE COMPLIANCE badge). Available on every plan, Lite included. One toggle, two effects.

2Effect 1: parental math gate
Every external link, every IAP purchase, every contact email, every account-settings action shows a math-problem prompt before proceeding. "What is 12 + 7?" Listener answers, action proceeds. Wrong answer, action cancels. Per Apple Guideline 1.3.

3Effect 2: family-safe AdMob
AdMob ad requests carry TFCD (tag for child-directed treatment) and TFUA (tag for users under age of consent) flags. AdMob then serves only family-safe, non-personalised ads. Required by Google Play Families policy.
4Saving + Apple/Google declarations
Save Settings ships the toggle live within ~5 min. But you ALSO need to declare your app as primarily for children in App Store Connect (App Information → Made for Kids) and Play Console (Policy → App content → Target audience). Both store-side declarations are reviewed independently of the toggle.
- Toggle ON but ads still personalised: the toggle ships LIVE via config, and the TFCD/TFUA flags get attached at runtime to every ad request. But the app caches config — force-quit and reopen to pick up the new value.
- App Store rejects with "Made for Kids declaration missing": the toggle in nerapo is not enough — you also need to flip the declaration in App Store Connect.
- Mixed audience (kids + adults): if any reasonable interpretation is "primarily for children", enable. Apple's reviewers are conservative.
Recap
- Kids mode is one toggle in Settings → Features.
- Available on every plan.
- Effect 1: parental math gate on every external action.
- Effect 2: family-safe AdMob (TFCD + TFUA flags).
- Also declare in App Store Connect AND Play Console.
Multi-language translations
You'll need: Pro or Agency plan. Important: translations are NOT live — they ship with your next build.
1English and Romanian are active by default
English and Romanian are active by default — they ship as the developer-maintained baseline and you can override any string you want from the dashboard. Anything else, you add yourself. Pro and Agency only.
Open Translations and you see EN and RO already in the active strip. They are the developer-maintained baseline that ships inside the source repos. If a listener's device is set to English, they see the English baseline; Romanian device, Romanian baseline. Anything else falls back to English until you add it.
You can click EN or RO at any time and override individual strings — type your own phrasing, save, and only those strings change. Anything you leave blank still uses the original baseline. Most clients leave EN and RO untouched and just add other languages.
If you don't want either of them in your dashboard, click the small × on the pill. The language drops out of the active strip and any override you had is cleared — the source baseline keeps shipping unchanged. The pill comes back inside the 'Add a language...' dropdown so you can re‑add it later.

2Add a language
28 supported languages total — EN and RO are active by default, plus 26 others in the dropdown: Spanish, French, German, Portuguese, Dutch, Greek, Arabic, Japanese, Chinese, Russian, and more. Pick one, click Add. A new tab appears in the strip, named with the language. The editor below switches to that language.
3The translation editor
Grouped by section — Tab Bar Labels, Account, Settings, Errors, Empty states. Each row: string identifier on the left, English source as placeholder, editable field for your translation. Missing translations fall back to the language baseline (or English if no baseline exists) at runtime — so leave a field blank for strings you haven't got to yet. Most clients translate Tab Bar, Account, and high‑traffic buttons first.
Click × to remove a language. For extra languages (German, Spanish, French and the rest), removing also deletes any saved translations for that language — no undo. For EN and RO, removing only drops the override; the source baseline keeps shipping, and the pill comes back inside the dropdown so you can re‑add it later without losing the baseline.

4The "not live" rule
Translations get compiled into Localizable.strings (iOS) and strings.xml (Android) at download time. To push a change: save here, download a fresh ZIP from Overview, build in Xcode and Android Studio, upload to App Store Connect and Play Console, wait for review. Roughly 24-72 hours from save to listener.
- Added a language but translated nothing: language is selectable but every string falls back to English.
- Translated everything but the test phone still shows English: haven't re-downloaded and re-built. Not live.
- Removed a language by mistake: no undo.
Recap
- Translations are Pro+ only.
- EN and RO are active by default. Click × on either to drop them out of the strip (source baseline keeps shipping) — the pill reappears in the dropdown so you can re‑add it later.
- Editor: section groups, each row with the English source as the label + your field. Same layout for every language. Missing strings fall back to the language baseline (or English if none) at runtime.
- Save per language. No autosave.
- Translations are NOT live — they ship with the next build. Plan accordingly.
Push & Sign-In overview
You'll need: dashboard unlocked. This section is the map for the next four (OneSignal, Firebase, Apple Sign-In, Google Sign-In).
1Read the page top to bottom
Push & Sign-In is intentionally ordered as a setup checklist. Section 1 explains the Google project relationship — read before you create anything in Cloud or Firebase. Sections 2-5 are credential fields. Section 6 is OneSignal credentials. Section 7 is a status check.

2Section 1: project relationship warning
Every Firebase project IS a Google Cloud project. Create them separately and your SHA-1 fingerprints will collide. Two valid paths: create Cloud first then attach Firebase, OR create Firebase first then use that project in Cloud. Don't create one in each independently.

3Sections 2-6: credential fields
Section 2 (all plans): Android Firebase config file upload. Sections 3-5 (Pro+): Google Sign-In Web Client ID, SHA-1 fingerprints (dev + Play Store post-publish), Apple Sign-In bundle ID. Section 6: OneSignal App ID + REST API Key.
4Section 7: status check + recommended order
Status check tells you in one glance what's missing — red/green dots per requirement. Setup order from zero: OneSignal first, then Firebase if you're on Android, then Google Sign-In + SHA-1 (Pro+), then Apple Sign-In (Pro+), then post-publish SHA-1 (after first Play Store upload).

- Set up Google Sign-In first then created Firebase separately: SHA-1 collision. Read Section 1 first.
- Lite and Sign-In sections aren't there: correct, Pro+ only.
- Status check all green but Push doesn't work on a real device: the new credentials ship live via config refresh, but the app needs to re-initialise OneSignal — force-quit the app and reopen. (The one exception is Firebase
google-services.jsonfor Android push, which IS baked into the ZIP at download time.)
Recap
- One page, 7 sections, ordered as a setup checklist.
- Section 1: project relationship — read before creating Cloud / Firebase.
- Sections 2, 6: Push setup (OneSignal + Firebase). Available on Lite.
- Sections 3, 4, 5: Sign-In setup. Pro+ only.
- Section 7: status check.
- Order: OneSignal → Firebase → Google Sign-In → Apple Sign-In → post-publish SHA-1.
OneSignal account setup (free tier covers nerapo apps)
You'll need: ~8 min. OneSignal free tier supports up to 10,000 subscribers, which covers most nerapo apps.
1Create your OneSignal account
Visit onesignal.com, click Sign up, fill the form. Verify your email. You land on the OneSignal dashboard with a "New App/Website" prompt.

2Create an app and pick platforms
Click "New App/Website". Name your app (match your nerapo app name). Pick the platforms — tick iOS + Android. OneSignal then walks you through per-platform configuration.

3iOS — Apple Push (APNs Auth Key)
For iOS, OneSignal asks for an Apple APNs Auth Key (.p8 file). Generate it from Apple Developer → Certificates, Identifiers & Profiles → Keys → Apple Push Notifications service (APNs). Download the .p8 file, paste your Key ID and Team ID into OneSignal.
4Android — Firebase Service Account
Android push uses Firebase Cloud Messaging. OneSignal asks for a Firebase service account JSON. Get it from Firebase Console → Project Settings → Service Accounts → Generate new private key. Upload the JSON to OneSignal. (Full Firebase setup in step 23.)
5Copy App ID + REST API Key back to nerapo
Finish the OneSignal app setup. Open Settings → Keys & IDs. Copy the OneSignal App ID and REST API Key. In your nerapo dashboard, paste both into the Push & Sign-In page Section 6. Save. Both ship LIVE via the next config refresh — the iOS app re-initialises OneSignal on the next configRefreshed event, the Android app picks them up on next cold start. No rebuild needed.

- APNs .p8 download fails: Apple lets you download the .p8 ONLY ONCE at creation time. If you missed it, delete the key and create a new one.
- Android push doesn't arrive: Firebase service account JSON is for the same Firebase project your app uses. Get it after step 23.
- OneSignal IDs set in dashboard but push still fails on device: the new App ID is LIVE in the config, but the OneSignal SDK already initialised with the old value at app launch. Force-quit the app and reopen — cold start re-initialises with the new ID.
Recap
- OneSignal handles push delivery for iOS and Android.
- iOS needs an APNs Auth Key (.p8) from Apple Developer.
- Android needs a Firebase service account JSON.
- Paste OneSignal App ID + REST API Key into nerapo Push & Sign-In page.
- OneSignal App ID + REST API Key ship LIVE via config refresh. Force-quit + reopen on first set so the SDK initialises with the new App ID.
Firebase for Android push notifications
You'll need: Google account, your Android package name from the wizard. ~7 min.
1Pick the project relationship FIRST
Recap from step 21: Firebase IS a Google Cloud project. If you'll use Google Sign-In later (Pro+), create one Google Cloud project first, then attach Firebase to it. Otherwise just create the Firebase project directly — it will create the matching Cloud project under the hood.
2Create a Firebase project
Visit console.firebase.google.com. Click Add project. Name it. Disable Google Analytics (optional, simpler). Wait for the project to provision.

3Add an Android app to the project
On the project home, click the Android icon. Enter your Android package name (must match your nerapo bundle ID). App nickname is optional. SHA-1 debug fingerprint is optional here — we'll add it in step 25. Click Register app.

4Download google-services.json
Firebase generates a google-services.json file. Download it. This file embeds your Firebase project ID, API key, and config — it's safe to commit (nothing secret).

5Upload to nerapo + re-download ZIP
In your nerapo dashboard, Push & Sign-In page, Section 2 — Android Firebase config. Upload the google-services.json file. Save. Re-download the Android ZIP from Overview. The file gets dropped into the Android Studio project automatically.
- Package name typo in Firebase: Firebase tracks it per-project. Wrong name = push targets the wrong app. Delete the Android app in Firebase and re-register with the correct name.
- Multiple
google-services.jsonfiles mixed up: each Firebase Android app has its own. Upload the one matching your nerapo bundle ID. - Created Firebase and Cloud separately: SHA-1 collision later. Start over with the right relationship.
Recap
- Firebase IS a Google Cloud project under the hood.
- Create the project, add an Android app with your bundle ID as package name.
- Download
google-services.json. - Upload to nerapo Push & Sign-In Section 2.
- Re-download the Android ZIP after.
Sign in with Apple (iOS)
You'll need: Pro+ plan. Active Apple Developer Program membership ($99/year).
1Open the App ID in Apple Developer
Visit developer.apple.com identifiers. Find your App ID (matches your nerapo iOS bundle ID). Click it.
2Enable the Sign in with Apple capability
On the App ID detail page, scroll to Capabilities. Tick "Sign In with Apple". Click Save at the top. Apple may prompt you to confirm.

3Copy bundle ID into nerapo
In your nerapo dashboard, Push & Sign-In Section 5 — iOS Sign in with Apple. The field accepts your iOS bundle ID. Paste, save.
4Re-download ZIP, rebuild, test
The bundle ID itself ships LIVE via config refresh, so the value in nerapo updates immediately. But the Sign in with Apple entitlement on the iOS app is build-time — if this is the first time you're enabling Sign in with Apple, you need a fresh ZIP. Re-download the iOS ZIP from Overview. Open in Xcode — "Sign in with Apple" appears in Signing & Capabilities. Build and run on a real device (Sign in with Apple needs a real Apple ID account; doesn't fully work on simulator).
- Sign in with Apple works on simulator but fails on real device: the bundle ID value ships live, but if the device build doesn't carry the Sign-In entitlement (first-time enable), you need a fresh ZIP. Re-download once after first enable.
- "Sign in with Apple" capability missing in Xcode: didn't save the App ID change in Apple Developer. Re-check the checkbox + Save.
- Apple rejects review with "Sign in with Apple not implemented": if your app offers other social sign-ins (Google, Facebook), Apple Guideline 4.8 requires Sign in with Apple too.
Recap
- Pro+ only.
- Enable Sign in with Apple capability on your App ID in Apple Developer.
- Paste iOS bundle ID into nerapo Push & Sign-In Section 5.
- First-time enable: re-download ZIP for the new entitlement, build, test on real device. After that, bundle ID changes ship LIVE via config refresh.
Google Sign-In + SHA-1 fingerprints (Android)
You'll need: Pro+ plan. Firebase project from step 23. JDK installed (for the keytool command).
1Generate the debug SHA-1 fingerprint in Android Studio
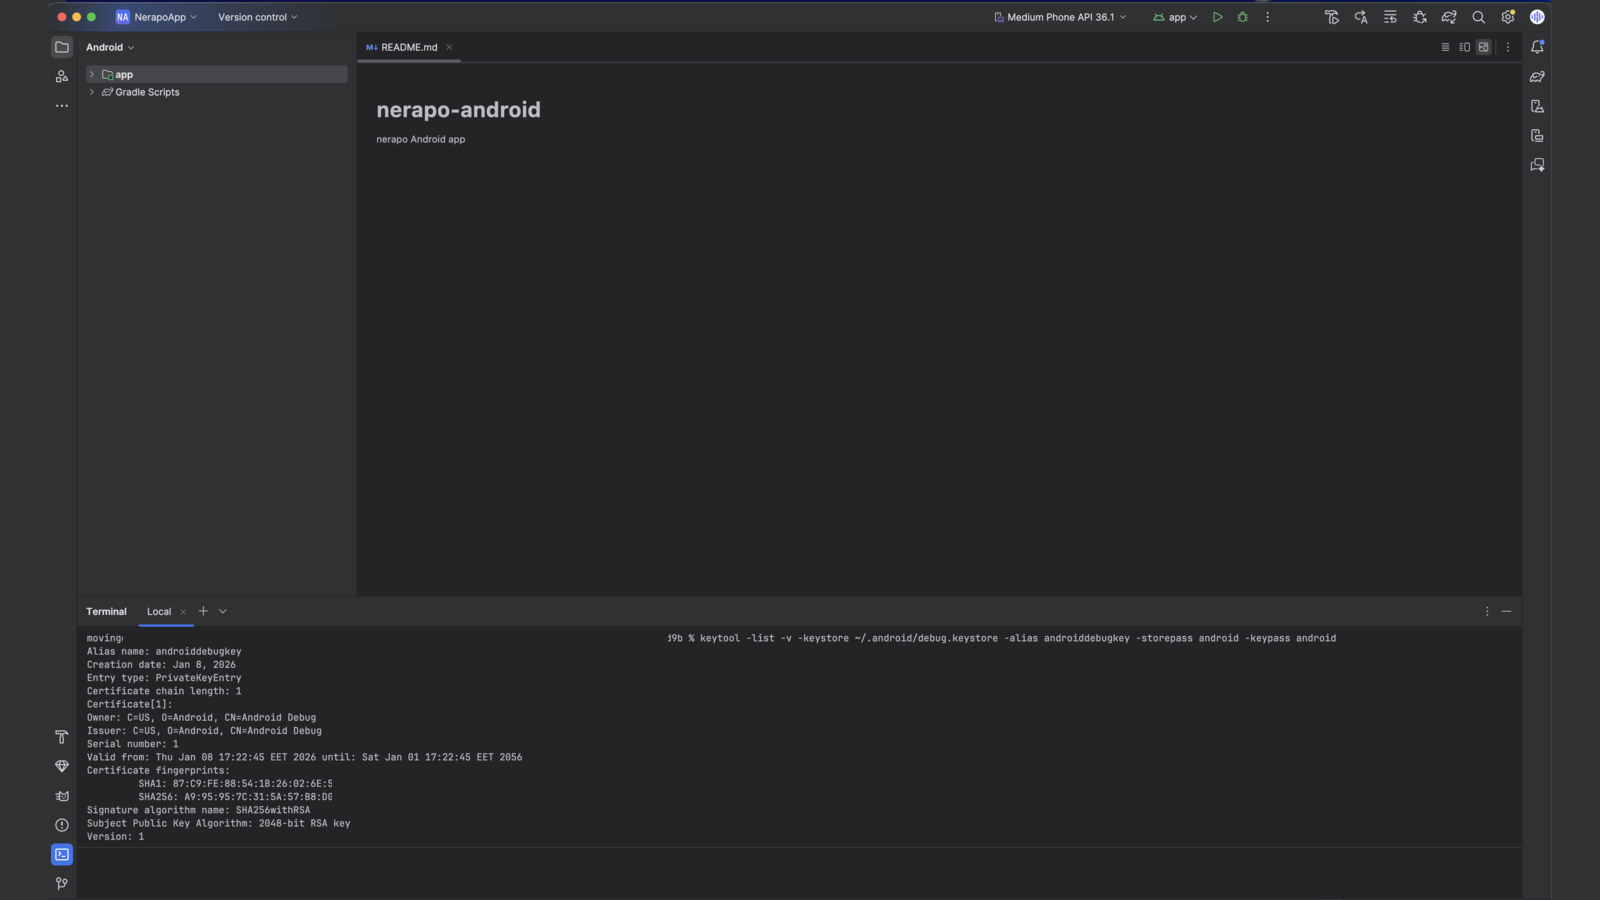
Open the terminal in Android Studio (low left-side), run:
keytool -list -v -keystore ~/.android/debug.keystore -alias androiddebugkey -storepass android -keypass androidCopy the SHA1 line from the output. This is your debug fingerprint — identifies your Android Studio installation.
2Add SHA-1 to your Firebase Android app
Firebase Console → your project → Project Settings → Your apps → Android app → Add fingerprint. Paste the debug SHA-1.

3Get the Google Sign-In Web Client ID
Same Firebase Project Settings page (or in Google Cloud), scroll down to, or search for, "OAuth 2.0 client IDs". You'll see a "Web client (auto created by Google Service)" entry. Click it. Copy the Client ID (looks like xxxxx.apps.googleusercontent.com).

4Paste into nerapo + re-download
nerapo dashboard, Push & Sign-In Section 3 — Google Sign-In Web Client ID. Paste, save. Ships LIVE via config refresh — the Android app picks it up on next cold start. (For your own testing build in Android Studio + run on device, but no production rebuild is needed for the Web Client ID change.)
5After Play Store publish: add the Play App Signing SHA-1
Once your app is on the Play Store, Google re-signs it with their own key. That's a NEW SHA-1, different from your debug one. Get it from Play Console → Setup → App integrity → App signing. Add it to Firebase as a second fingerprint. Covered in detail in step 30.
- Google Sign-In works locally but fails after Play Store publish: haven't added the Play App Signing SHA-1. See step 30.
- keytool not found: JDK isn't on your PATH. Install JDK or use Android Studio's bundled keytool:
$(brew --prefix openjdk)/bin/keytoolor similar. - Multiple Web Client IDs in Cloud Console: use the "Web client (auto created by Google Service)" one. Others are for different OAuth contexts.
Recap
- Generate debug SHA-1 with keytool.
- Add it to Firebase Project Settings → your Android app.
- Copy the Web Client ID from OAuth 2.0 client IDs.
- Paste into nerapo Push & Sign-In Section 3. Ships LIVE via config refresh.
- After Play Store publish: add a second SHA-1 from Play Console App signing.
Premium paywall — the big picture
You'll need: Pro+ plan. The actual store-side product configuration is covered in Part 5 (videos 28-29).
1What "paywall" means in nerapo
Paywall = some content (stations, podcasts, audiobooks, video podcasts) is marked Premium. Free listeners hit a "Subscribe" screen when they try to play it. Subscribers play freely. You flag content as Premium in each section's Access dropdown.

2Stripe vs Apple/Google IAP
nerapo's monthly subscription (Lite, Pro, Agency) runs through Stripe — you, the client, pay nerapo. Your end-users' Premium subscriptions run through Apple/Google IAP — they must, per Apple Guideline 3.1.1 and Google Play Payments policy. You can't use Stripe for end-user subscriptions inside an iOS or Android app.
3Apple takes 30% (or 15%), so does Google
Standard cut: 30% in year 1 of a subscriber, 15% from year 2 onward (Apple). 15% on first €1M revenue/year for Small Business Program (Apple). 15% on subscriptions from day 1 (Google). Plan your pricing accordingly — if you charge €9.99/month, you receive ~€7/month after cuts.
4Settings → Monetization flow
The actual store-side product configuration is covered in Part 5 — Apple IAP products (step 28) and Google Play Billing (step 29). Once you have product IDs from both stores, paste them into nerapo Settings → In-App Monetization. Flag content as Premium in each section. Save. Both product IDs and the Premium flags ship LIVE via config refresh — end users see the paywall on the next config refresh, no rebuild needed.

- Tried to use Stripe for end-user subs inside the app: Apple/Google will reject the build at review. Must use IAP.
- Set product IDs in nerapo but never created them on the stores: in-app purchase dialog fails. Create in App Store Connect / Play Console first.
- Premium content flag set but everything stays free: Content Access dropdown in Settings → Monetization is set to "Everyone gets free access". Flip it to "Premium content requires a subscription".
Recap
- Premium flag per content item gates it behind a subscription.
- End-user subscriptions go through Apple IAP / Google Play Billing — required.
- Apple/Google take 15-30% commission.
- Set product IDs in Settings → In-App Monetization after creating them on the stores (Part 5, videos 28-29).
GDPR / CCPA user data requests
You'll need: dashboard unlocked. This is how you handle the "please delete my data" requests you'll get under EU and California privacy law.
1Where User Data Requests lives
Sidebar → Customization → User Data Requests. Not visible in demo mode (real production only).

2Card 1: push the listener to self-serve
Most data deletion happens IN-app: the listener taps Account → Delete account. nerapo handles the rest (sign-out, OneSignal logout, audit log). This card has a copy-paste reply template you send the listener — gives them the step-by-step.
3Card 2: manual search (when they can't self-serve)
If the listener has lost access to the in-app delete (uninstalled, lost phone), use this card. Paste their email. nerapo searches your end-user accounts for a match and shows you what it found.

4Card 3: confirm + delete
Card 2's search results expand into Card 3. Verify the match (compare to the listener's request — same email, same display name). Click Delete. nerapo permanently removes the account, drops the push subscription, sends the listener a confirmation email, and records an anonymous deletion entry in the compliance log so you can prove erasure if ever asked.
5When you need to escalate
Bottom of the page: escalation card. If the listener disputes ("you deleted but my data is still there") or the request involves unusual circumstances (legal hold, ongoing fraud investigation), forward to nerapo support — we have audit-table access and can verify deletion.
- Listener says "my data is still there" after self-serve delete: they're probably on a cached profile in another app session. Force-quit and reopen.
- Search returns no results: the listener never signed in. Their device is anonymous; there's nothing to delete.
- Deleted by mistake: the row is gone; the audit table holds metadata only. There's no full undelete. Communicate clearly.
Recap
- Three-card flow: push self-serve, manual search, confirm + delete.
- Self-serve delete (in-app) handles 95% of requests.
- Each manual deletion is recorded as an anonymous entry in the compliance log — proof of erasure if you ever need to show it.
- Escalate to nerapo support if disputed or unusual.
- Hidden in demo mode — real production only.
Part 5 of 6 · 3 steps · ~22 minutes total
Part 5 — Monetize on the stores
Set up in-app subscriptions and update the post-publish SHA-1 fingerprint.
Create Apple IAP subscription products
You'll need: Apple Developer Program ($99/year). Your iOS app already registered in App Store Connect (covered in step 04).
1Open App Store Connect → your app → Monetization
appstoreconnect.apple.com. Pick your app. Left sidebar → Monetization → Subscriptions.

2Create a Subscription Group
Click + next to Subscription Groups. Name it (e.g. "Premium Access"). Subscriptions must live inside a group. The group lets users switch between tiers (monthly vs yearly).

3Add the subscription product
Inside the group, click + to add a subscription. Fill: Reference Name (internal, e.g. "Premium Monthly"), Product ID (e.g. com.yourapp.premium_monthly — cannot change after creation), Duration (1 month / 1 year / etc), Price per territory.

4Fill localizations + review screenshot
For each language Apple wants: display name + description (shown in the purchase sheet on the device). Upload a 1024 × 1024 review screenshot (Apple's reviewer sees what the listener sees). Save.
5Copy Product ID into nerapo + re-download
Settings → In-App Monetization → iOS Apple IAP Product ID. Paste, save. Ships LIVE via config refresh — the iOS app reads the Product ID at purchase time, so the next purchase attempt uses the new ID. Listeners on Premium content now hit the IAP sheet with your subscription. No rebuild needed.
- "Cannot change Product ID after creation": chose poorly the first time? Create a new product with the right ID, set the bad one to no longer be available for purchase.
- Sandbox account doesn't see your product: Apple sandbox needs the product to be "Ready to Submit" status. New products take a few hours to propagate.
- Subscriptions test fine on TestFlight but production listeners see "Cannot connect to App Store": usually a paid Apple Developer Program lapse. Check the membership status.
Recap
- Apple subscriptions live inside Subscription Groups.
- Product ID is permanent — pick carefully.
- Localizations + review screenshot required.
- Paste Product ID into nerapo Settings → In-App Monetization → iOS.
- Product ID ships LIVE via config refresh; no rebuild.
Create Google Play Billing subscription products
You'll need: Google Play Console developer account ($25 one-time). Your Android app already uploaded as at least Internal testing (covered in step 05).
1Open Play Console → your app → Monetize
play.google.com/console. Pick your app. Left sidebar → Monetize → Products → Subscriptions.

2Create a subscription
Click Create subscription. Product ID (e.g. premium_monthly — lowercase letters, digits, dot and underscore only; permanent). Name + Description (shown in the purchase sheet). Save.

3Add a base plan
Inside the subscription, click Add base plan. At least one is required. Pick billing period (P1M = 1 month, P1Y = 1 year). Set price per country. Save the base plan.

4Activate the subscription
Subscriptions must be Active for users to buy. Click Activate at the top of the subscription detail page.
5Copy Product ID into nerapo + re-download
Settings → In-App Monetization → Android Google Play Billing Product ID. Paste, save. Ships LIVE via config refresh — the Android app reads the Product ID at purchase time. No rebuild needed.
- Can't create subscriptions in Play Console: you need at least one signed APK/AAB uploaded to Internal testing first. Build and upload before configuring IAPs.
- Test purchase fails with "Item unavailable": the subscription isn't Active, or your test Google account isn't in the License Testing list (Play Console → Setup → License Testing).
- Price feels too low after cut: Google takes 15% on subscriptions from day 1 — so €9.99 nets €8.49.
Recap
- Subscriptions need at least one Active base plan.
- Product ID is permanent. Lowercase + digits + dot + underscore only.
- Test with a License Testing account before going live.
- Paste Product ID into nerapo Settings → In-App Monetization → Android.
Post-publish SHA-1 update (Google Sign-In on Android)
You'll need: first Play Store release published. Pro+ with Google Sign-In configured. ~5 min, done once.
1Why this is needed
When you uploaded your AAB, Play App Signing re-signed your app with Google's canonical key — a DIFFERENT SHA-1 than the one from your local keystore (which you registered in step 25). Until you add this new SHA-1 to Firebase, Google Sign-In fails on the production build.
2Get the production SHA-1 from Play Console
play.google.com/console → your app → Setup → App integrity → App signing. Copy the "SHA-1 certificate fingerprint" under "App signing key certificate" (NOT "Upload key certificate").
OR
Go to Google Play Console and select your app
Look at your browser's address bar — the URL will look like this:
https://play.google.com/console/u/0/developers/XXXXX/app/YYYYY/tracks/production
Replace the last part of the URL (/tracks/production or whatever appears after the app ID) with /keymanagement, then press Enter
You'll land on the App signing page — copy the SHA-1 from the "App signing key certificate" section.
Note: Google occasionally redesigns the Play Console menu, so the in-app navigation path may differ from what you see in older tutorials. The /keymanagement URL trick is the most reliable way to reach this page directly.

3Add it to Firebase as a second fingerprint
Firebase Console → your project → Project Settings → Your apps → Android app. Click Add fingerprint. Paste the production SHA-1. Save. Firebase regenerates google-services.json — download the new version.
4Upload the new google-services.json to nerapo + re-publish
Push & Sign-In page Section 2: upload the regenerated google-services.json. Save. Re-download Android ZIP. Rebuild + Generate Signed AAB + upload to Play Console as a new release.
- Used the Upload key SHA-1 instead of the App signing key SHA-1: Sign-In still fails. The right one is under "App signing key certificate".
- Forgot to regenerate
google-services.jsonafter adding the fingerprint: Firebase updates the file based on registered fingerprints. Always re-download after adding. - Listeners on the old build can still Sign in: they're using the cached config. Force-quit / reopen pulls the new one.
Recap
- Post-publish, Google re-signs your app with its own key — new SHA-1.
- Add it to Firebase as a second fingerprint.
- Regenerate + re-upload
google-services.json. - Rebuild + republish.
- Done once per Android app.
Part 6 of 6 · 5 steps · ~32 minutes total
Part 6 — Maintenance & support
Five videos for life after publish. What ships live vs what needs a rebuild, the rebuild flow, plan changes / cancellation, Agency multi-app workflow, and how to actually reach your listeners after they install.
Update content live after publish
You'll need: app published on at least one store. This is what "live update" actually means in nerapo.
1How config refresh works
Every nerapo app fetches its configuration from your dashboard on cold start and every Cache TTL seconds while running. The configuration carries your stations, podcasts, audiobooks, video podcasts, news feeds, banners, branding (most of it), tab order, custom HTML tabs, settings, paywall flags, OneSignal App ID + REST Key, AdMob App ID + Banner Unit ID, Google Sign-In Web Client ID, Apple/Google IAP product IDs, kids mode toggle — everything except a short list of build-time things (next step). Change any of those in the dashboard, hit Save, the next refresh picks it up.

2When listeners see your change
Cold start (listener opens the app fresh): instant. Warm resume (listener returns to the app from background): on the next TTL boundary (default 60 seconds). Active session (listener is actively using the app): on the next TTL boundary.
3How to force-refresh on a test device
Two options. (a) Force-quit the app, reopen — cold start. (b) Wait Cache TTL seconds. There's no "refresh now" gesture in the app on purpose — production listeners shouldn't need one.
4What doesn't ship live
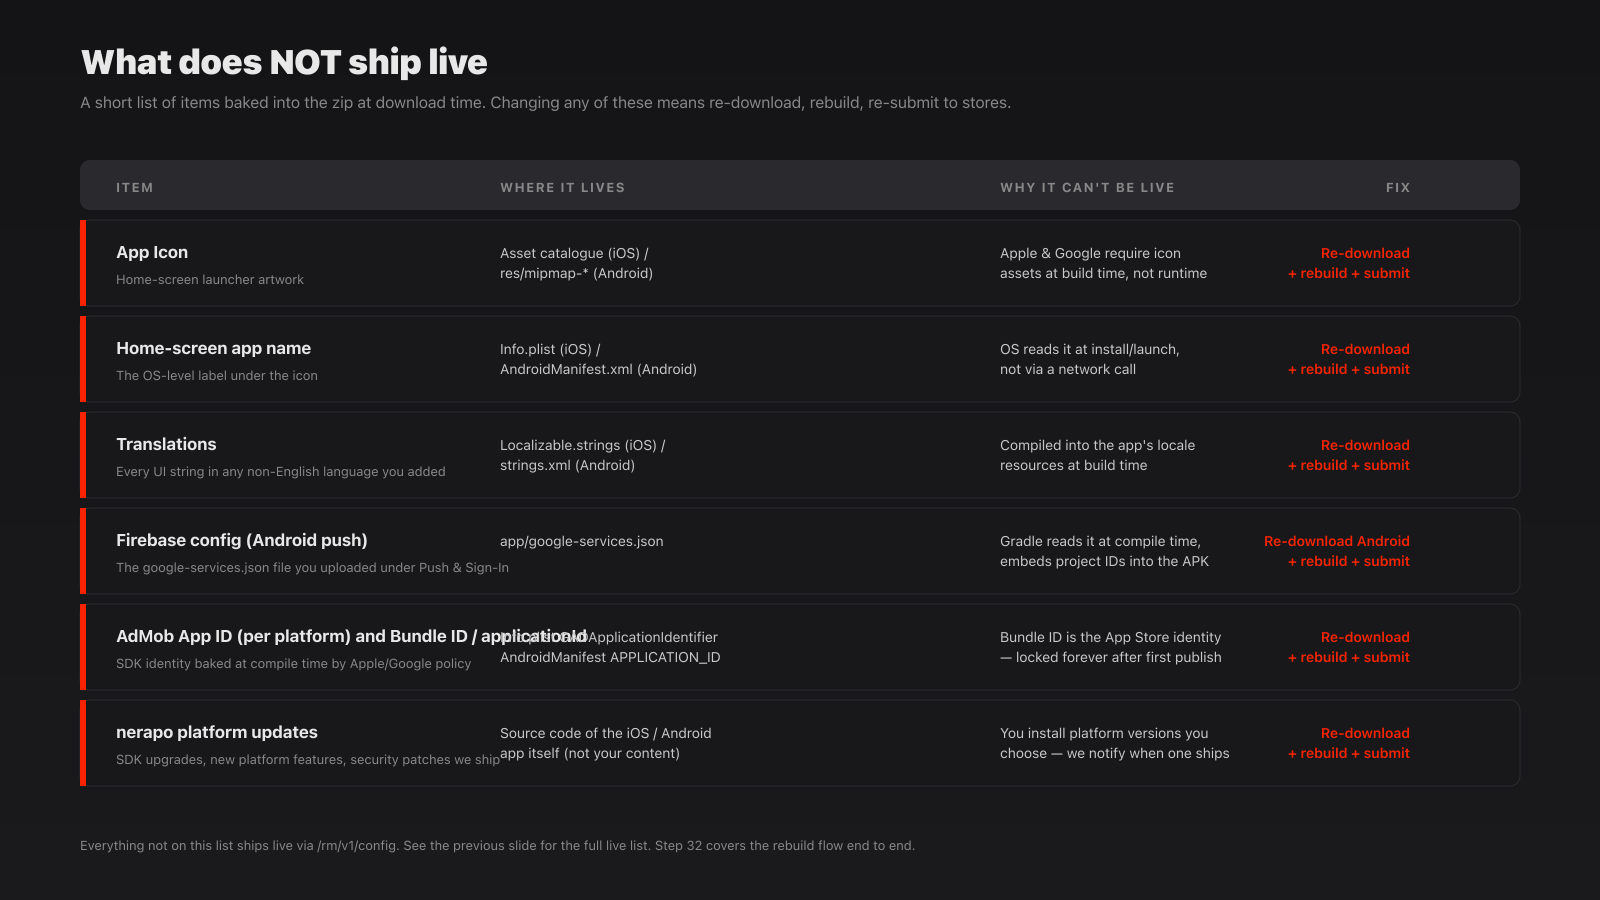
Short list. App Icon, the home-screen-icon label (the OS-level app name in Info.plist / AndroidManifest), translations (baked into Localizable.strings / strings.xml), Firebase google-services.json (Android push, baked at ZIP download time), and the underlying nerapo platform code (any platform updates we ship). Plus bundle ID changes — but those are essentially a new app on the stores. Step 32 covers the full rebuild flow.
- Saved a change but the test device still shows old: force-quit and reopen.
- Cache TTL very high so listeners don't see updates: bump it down. 60 s is the default and a good balance.
- Listener reports something out of date a week later: their app has been backgrounded the whole time. iOS suspends apps after a while; first foreground triggers a fresh fetch.
- Changed OneSignal / AdMob / IAP / Sign-In credentials and they don't take effect: they DO ship live via config, but the SDKs initialised with the old values at app launch. Force-quit and reopen on a test device.
Recap
- Config refresh = how live updates reach the app.
- Cold start: instant. Warm resume / active: next TTL boundary.
- Default TTL: 60 s. Configurable in Settings → Cache.
- Live: content, branding (most), AdMob IDs, OneSignal IDs, Sign-In credentials, IAP product IDs, kids mode, paywall flags, social links.
- Not live: App Icon, home-screen app name, translations, Firebase
google-services.json, nerapo platform code.
When to rebuild and re-publish
You'll need: understanding of the live config from step 31.
1The full rebuild list
Five reasons to download a fresh ZIP and re-publish:
- App Icon changed (baked into the build).
- Home-screen app name changed (the OS-level label under the icon — baked into Info.plist / AndroidManifest).
- Translations added or edited (baked into
Localizable.strings/strings.xml). - Firebase
google-services.jsonchanged (Android push only — the file is baked into the Android ZIP at download time). One-time setup for most clients; rare to touch again. - nerapo platform update — we ship bug fixes and store-compliance updates a few times a year.
Everything else — OneSignal credentials, AdMob IDs, Apple/Google Sign-In credentials, IAP product IDs, kids mode, paywall flags, content, branding (most of it), tab order, HTML tabs — ships LIVE via config refresh. No rebuild needed.
2The flow
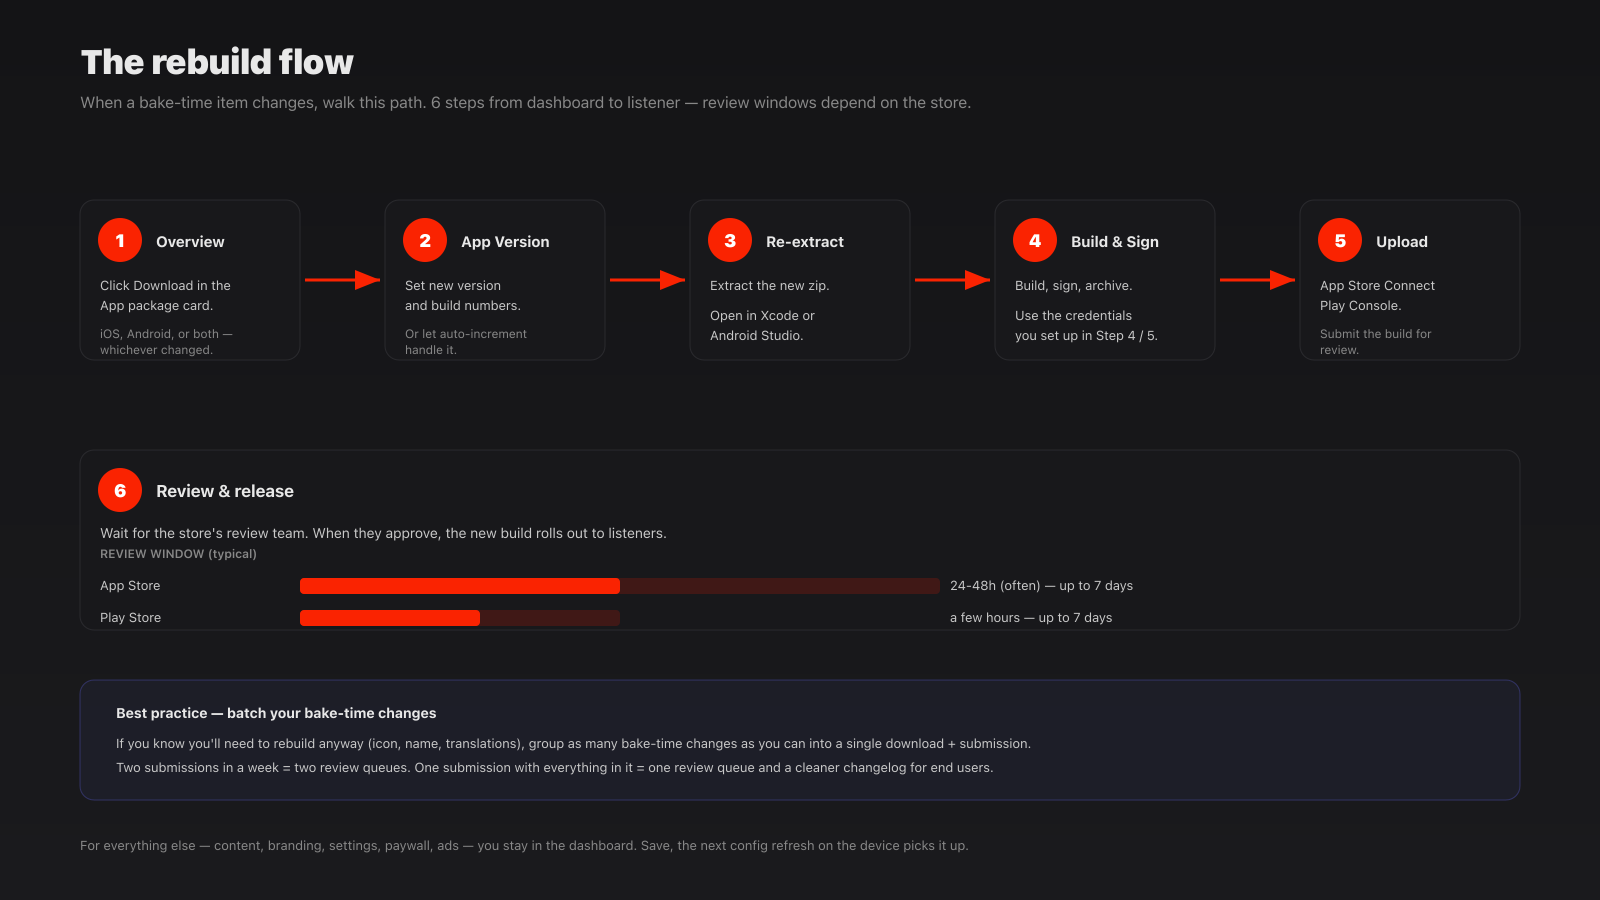
Overview → Download (iOS or Android, or both). Set new version + build numbers in the App Version card (or use auto-increment). Re-extract, open in Xcode / Android Studio. Build, sign, archive, upload to App Store Connect / Play Console. Submit for review. 1-7 days for review depending on platform.
3Version + build numbers
Overview → App Version card. Visible version ("1.0.1") is what listeners see. Build numbers (iOS CFBundleVersion + Android versionCode) are the integers stores use to compare uploads. Each upload to a store must be a HIGHER build number than the previous one. Auto-increment toggle saves you the math — nerapo bumps the build number every download.

4How often is normal?
For a stable nerapo app, you'll rebuild and republish maybe 3-6 times a year: 1-2 platform updates from us, 1-2 of your own translation rounds, occasional icon or home-screen-name refreshes. Not weekly. The config-refresh model handles routine content + credential changes.
- Submitted a build with a lower build number than the last: Apple/Google reject. Bump it manually or use auto-increment.
- Listeners report "app crashes after the update": rare but possible. Worst case, revert by submitting a fresh build with the same code from your last working ZIP.
- Saved translations but listeners still see English: haven't re-published. Translations are build-time.
Recap
- Five reasons to rebuild: App Icon, home-screen app name, translations, Firebase
google-services.json, nerapo platform updates. - Everything else — OneSignal/AdMob/Sign-In/IAP credentials, content, branding — ships LIVE via config refresh.
- Set version + build numbers in Overview → App Version (or use auto-increment).
- Each upload must be a higher build number than the previous.
- Normal cadence: 3-6 rebuilds/year for a stable app.
Upgrade, downgrade, manage subscription, view invoices, cancel
You'll need: dashboard sidebar → Billing.
1The Billing page at a glance
Top: current plan, price, cycle, next renewal date. Below, in order: upgrade / downgrade panels (in-dashboard); a Manage subscription card with two buttons (Open Stripe Billing Portal and View invoices); a Cancel subscription button below that; and a plan comparison table at the very bottom.

2Upgrade (in-dashboard, instant, prorated)
Click any upgrade option. A “Confirm upgrade” modal shows the prorated cost. Confirm. Stripe charges the difference and the plan switches instantly. Premium features unlock within seconds.
3Downgrade (queued for end of cycle)
Click a downgrade option. The change is queued for the end of your current billing period. You keep the higher plan’s features until then. A “Plan change scheduled” banner appears with a Cancel change button if you reconsider.

4Manage subscription — the Stripe Billing Portal
Inside the Manage subscription card, click Open Stripe Billing Portal →. A new tab opens with Stripe’s hosted billing page. From there you can update your payment card, edit billing address and tax ID, and cancel the subscription. The Portal also lists Stripe’s payment confirmations — useful as a transaction log, but these are not fiscal invoices. The actual invoices live in your dashboard — next step.

5View invoices — fiscal invoices for your bookkeeping
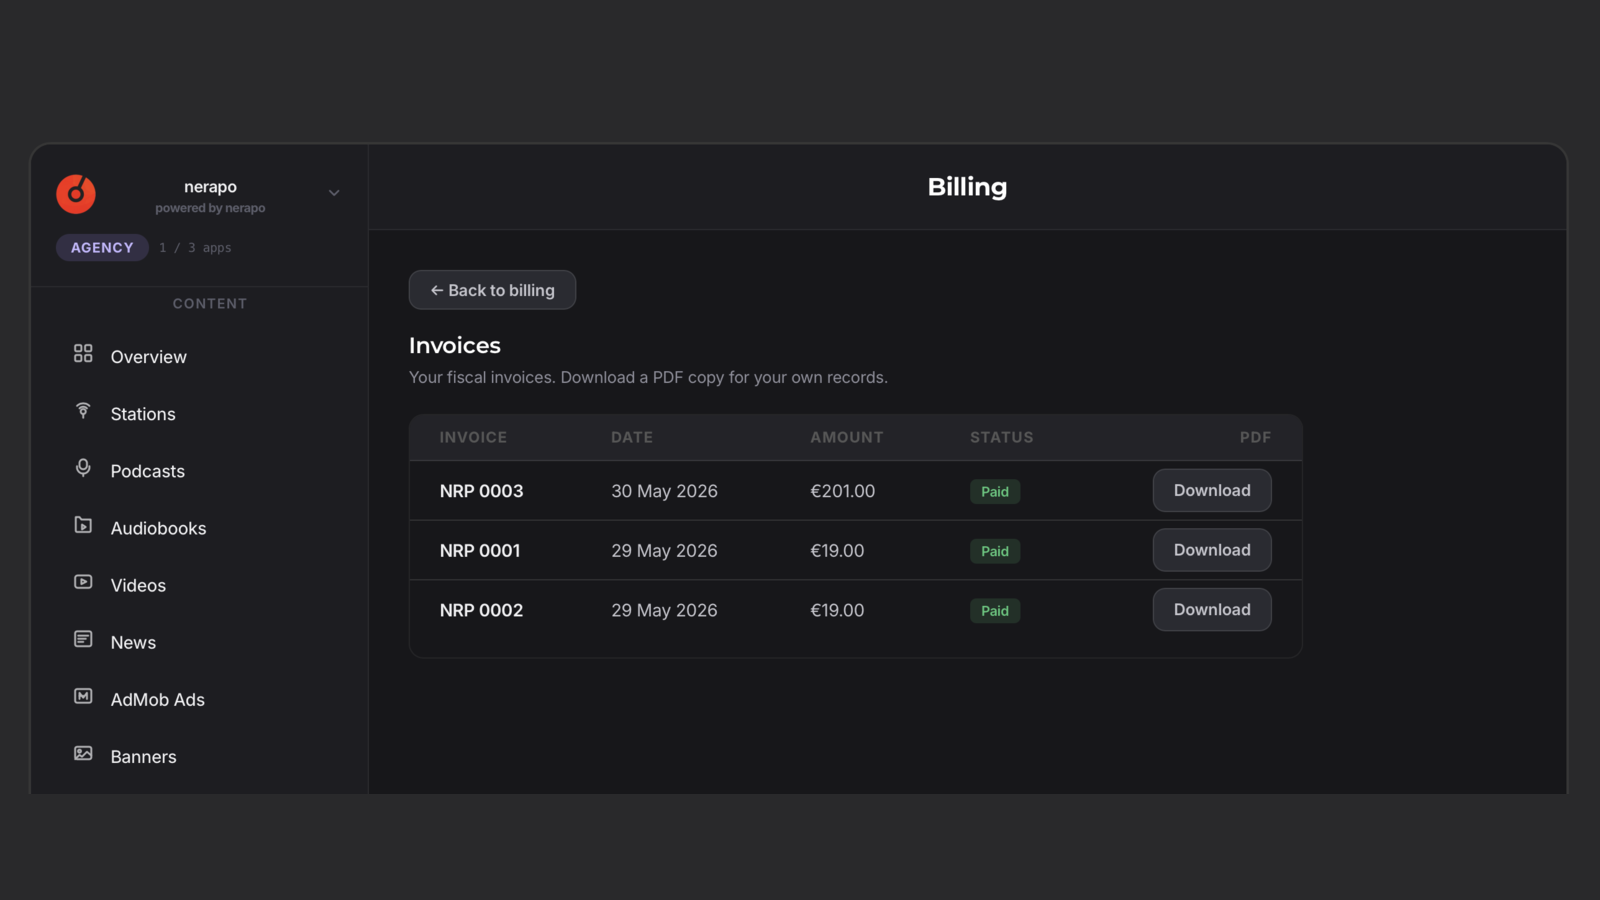
Right next to the Portal button, the View invoices button. Click it — the Billing page swaps to an Invoices panel listing every invoice nerapo has issued for your account: number, date, amount, status, and a Download PDF link per row. These are your fiscal invoices — the legally valid documents for your accounting. Click Back to billing when done; the panel collapses, you’re back on the main Billing view.
6Cancel (in-dashboard, alternative to the Portal)
Bottom of Billing — a small Cancel subscription button. Modal: “Cancel your subscription?”. Keep / Cancel buttons. Confirm: your subscription cancels at the end of the current period; you keep dashboard access until then. (The Stripe Billing Portal can also cancel — both routes do the same thing.)

7What happens after cancellation
End of period: the subscription marks inactive and your published apps go offline — end-users see your discontinued message. Your account stays signed-in-able and your app data is preserved for a 30-day grace period. Pick any new plan within those 30 days and everything comes back online seamlessly. After 30 days: app data is hard-deleted (your account itself stays, but you’d be starting fresh — fresh stations, fresh podcasts, fresh branding).
8Delete account is a separate, faster flow
If you want to wipe everything immediately — account, apps, data, all of it — use Delete account in Account settings instead of Cancel. That schedules a 15-day window post period-end for full account erasure: at the end of those 15 days, account + apps + content are all permanently deleted (billing records and invoices stay, by law). Cancel keeps your account alive at zero cost; Delete account ends the relationship completely. Different intents, different windows.
- Cancelled but still see the dashboard: correct — you keep access through end of period, plus the 30-day post-cancel grace afterwards.
- Want to keep your apps live while paying less: downgrade to Lite. Lite covers single-station hosting on all plans.
- Looking for an invoice in the Stripe Portal and can’t find one: the Portal only shows Stripe’s payment confirmations. Your fiscal invoices are in the dashboard under View invoices.
- Invoice PDF link missing on a row: the invoice is still being generated. Refresh in a minute; the PDF link appears once nerapo has issued it.
- Customer Portal shows wrong card: update it there. nerapo never sees it.
- Confusing Cancel with Delete account: Cancel keeps your account + 30 days of data grace. Delete account wipes everything in 15 days post period-end. Pick the intent that matches your situation.
Recap
- Upgrade: in-dashboard, instant, prorated.
- Downgrade: in-dashboard, queued for end of period.
- Manage subscription: Stripe Billing Portal — card, address, tax ID, cancel.
- View invoices: fiscal invoices for your bookkeeping (in-dashboard panel, PDF download per row).
- Cancel: in-dashboard button OR the Stripe Portal. End of period.
- After cancel: 30-day grace, app data preserved — pick any new plan to restore. After 30 days: app data hard-deleted, account stays.
- Delete account (separate flow, in Account settings): 15-day window post period-end, then everything wiped — account, apps, data.
Agency — manage multiple apps
You'll need: Agency plan. This section walks the multi-app workflow.
1The slot model
Agency uses graduated pricing: more slots, cheaper each. 1 slot at €69/month down to €29/slot at high counts. Slot counter visible in the sidebar header next to the plan badge.

2App switcher (top-left)
Sidebar header chevron opens the app switcher dropdown. Lists all your active apps with the current one marked. Below: archived apps with a Restore button each. Footer: Add new app button (greys out if you hit your slot cap), and an Add slot upgrade link.

3Add a new app
Click Add new app. New entry created. The wizard runs again for the new app (name, bundle ID, four logos). After finish, you land on its Overview, with the rest of the dashboard ready for that app's config.
4Switching between apps
Each app has its own everything: stations, podcasts, branding, push credentials, IAP product IDs. Switching contexts via the dropdown reloads the dashboard for the picked app. No data crosses between them.
5Archive vs delete
Account → Danger zone → Delete app removes the app permanently (you can't undo this). Archive (also under Danger zone, lighter wording) keeps the data but frees the slot. Restore from the app switcher dropdown later.

- Hit the slot cap: upgrade to more slots via Billing, OR archive an unused app to free its slot.
- Switched apps but the sidebar still shows old: hard refresh the browser. Dashboard re-fetches everything.
- Each app needs its own keystore, App ID, IAP products: yes — they're independent on the stores.
Recap
- Graduated pricing — more slots, cheaper each.
- App switcher top-left in sidebar header.
- Add new app re-runs the wizard.
- Each app independent: own data, own credentials, own store entries.
- Archive frees the slot; restore later. Delete is permanent.
Reach your listeners — push, banners, custom tabs
You'll need: Push & Sign-In configured (steps 22-25). This is the playbook for actually reaching listeners after publish.
1Compose a push notification
Sidebar → Push Notifications. Three fields: Title, Message, URL (optional). Click Send Push Notification. OneSignal delivers within a few seconds to all listeners with the app installed.

2When to send (and when not)
Good: weekly highlights, big news, a sponsored live show. Bad: "hi we miss you" with no actual content — listeners disable push fast. Roughly 1-3 sends per week is the upper limit for music/podcast apps. Track opens in OneSignal — if opens drop below 5%, you're sending too much.
3Banners + custom HTML tabs as second channels
Push is intrusive. Banners (step 14) and custom HTML tabs (step 18) reach listeners in-app, less noisy. Combine all three: push for time-sensitive, banner for the homepage promo of the moment, HTML tab for a permanent "Events" or "Shop" link.

4Why nerapo doesn't send email to your listeners
nerapo's apps don't collect listener email addresses for marketing. Email marketing for your listeners is your job, using Mailchimp / ConvertKit / your own tool. Channel it via your website signup or a Custom HTML tab linked to your newsletter signup page.
5Push analytics + end of the guide
OneSignal dashboard → Messages → per-send open rate, click rate, delivery success. Use it to tune cadence and topic. That wraps up the nerapo guide — from sign-up to listener reach. Now go ship.
- Push doesn't arrive: the OneSignal App ID is LIVE via config, but the SDK initialised with the old value at app launch. Force-quit the app and reopen so cold start re-initialises with the new App ID.
- Open rate dropped below 5%: too many sends. Cut frequency by half for a month, see if it recovers.
- Tried to email listeners directly through nerapo: not a feature. Use external email tools.
Recap
- Push from sidebar → Push Notifications. Three fields.
- 1-3 sends/week max for music/podcast apps.
- Banners + HTML tabs as second channels.
- Email marketing is your job — use external tools.
- Push analytics live in the OneSignal dashboard.